
In this post we move from lab setup to hands-on automation. The goal is to provision virtual machines on vSphere automatically by combining Ansible playbooks with a GitLab CI/CD pipeline. Everything lives as code in a Git repository: VM definitions, playbooks, and the pipeline that runs them. With a single commit, GitLab triggers Ansible, which talks to vCenter, which clones and customizes VMs from templates. The result is fast, consistent, and repeatable VM provisioning.
Configure Ansible and deploy one VM locally
Before we jump into GitLab pipelines and complex automation, it’s important to start small and make sure the basics work. The best way to do this is to run Ansible manually from the command line and deploy a single virtual machine on vSphere. If one VM works, we can confidently scale to many.
Repository layout
To keep everything organized, we’ll create a Git repository where all the Ansible files live. Think of this as a “source code” repo for our virtual machines.
Here’s the minimal structure we’ll start with:
vsphere-auto/
├─ ansible.cfg                 # Ansible config
├─ inventory.ini               # Explicit inventory
├─ requirements.yml            # Ansible collections (version-pinned recommended)
│
├─ vars/
│  ├─ common.yml               # Non-sensitive defaults (vCenter, DC/cluster/folder)
│  └─ secret.yml               # ENCRYPTED with Ansible Vault (vCenter user/pass)
│
├─ templates/
│  └─ os_map.yml               # maps OS names to VM templates in vCenter
│
├─ hosts/
│  ├─ _TEMPLATE.yml            # Copy/rename per-VM and fill parameters
│  ├─ HAM01VM001.yml           # VM definition #1
│  └─ HAM01VM002.yml           # VM definition #2
│
└─ playbooks/
   └─ vm_create.yml            # Deploy a single VM: -e vm_file=hosts/HAM01VM001.yml

Ansible configuration file
This is the ansible.cfg
[defaults]
inventory = ./inventory.ini
host_key_checking = False
stdout_callback = yaml
retry_files_enabled = False
Ansible inventory file
In Ansible, the inventory is the list of machines Ansible manages. Normally it contains hostnames or IPs of servers, organized into groups (like webservers or dbservers). Ansible uses this list to know where to run tasks.
By default, our inventory only had localhost, since Ansible runs locally to talk to vCenter. But we can make it more valuable: every time we define a VM in hosts/, we can also add it to the inventory.
This way:
- The inventory becomes a live overview of all VMs created.
- Later, if we want to configure the VMs after boot (via SSH or WinRM), they are already present in the inventory.
For example:
inventory.ini
# Control node
localhost ansible_connection=local

# Deployed VMs
[lab_vms]
HAM01VM001 ansible_host=192.168.10.51
HAM02VM003 ansible_host=192.168.10.52
Ansible requirements file
In this file we list the Ansible collections our project needs.
---
collections:
  - name: community.vmware
  - name: community.general
Notes
community.vmwarecontainsvmware_guest,vmware_guest_find, etc. (required).community.generalis optional but useful for filters/utilitiespyVmomi(the VMware SDK) is a Python package, so it’s installed viapip, not inrequirements.yml
Store common settings
We don’t want to repeat defaults like vCenter, cluster and folder for every VM, so we keep them in vars/common.yml:
vcenter_hostname: "vcsa.racklab.local"
validate_certs: false

vm_datacenter: "Datacenter1"
vm_cluster: "Cluster1"
vm_folder: "Servers"
Secure credentials with Ansible Vault
Instead of keeping the username and password in clear text, we create a vault file:
ansible-vault create vars/secret.ymlThis opens a text editor. Add my credentials inside:
vcenter_user: "administrator@vsphere.local"
vcenter_pass: "Secret123!"
When we save and close, Ansible encrypts the file. If someone opens it, they’ll only see scrambled text.
To run a playbook with Vault, add –ask-vault-pass (or point to a vault password file if you want to automate).
Map operating systems to templates
Each OS we want to deploy has a template in vCenter. To avoid typing long template names, we map them to short keys (templates/os_map.yml):
os_templates:
  ubuntu22: "Ubuntu-22.04"
  centos9: "CentOS-Stream-9"
  debian12: "Debian-12.10.0"
Define one VM
Our first VM will live in hosts/HAM01VM001.yml:
hostname: "HAM01VM001"
os: "ubuntu22"

cpu: 2
mem_mb: 2048

disks:
  - size_gb: 25
    type: thin
    datastore: "DatastoreESXi0"

networks:
  - name: "Production"
    type: static
    ip: "192.168.1.51"
    netmask: "255.255.255.0"
    gateway: "192.168.1.1"

dns_servers: ["192.168.1.1", "1.1.1.1"]
domain_name: "racklab.local"
The playbook
Here’s the Ansible playbook that brings all the files together and tells vCenter to deploy the VM:
- name: Deploy VM from hosts/<hostname>.yml
  hosts: localhost
  gather_facts: false
  collections: [community.vmware]

  pre_tasks:
    - include_vars: { file: "{{ playbook_dir }}/../vars/common.yml", name: common }
    - include_vars: { file: "{{ playbook_dir }}/../vars/secret.yml", name: secret }
    - include_vars: { file: "{{ playbook_dir }}/../templates/os_map.yml", name: osmap }
    - include_vars: { file: "{{ playbook_dir }}/../{{ vm_file }}", name: vm }

  tasks:
    - name: Clone and customize
      vmware_guest:
        hostname: "{{ common.vcenter_hostname }}"
        username: "{{ secret.vcenter_user }}"
        password: "{{ secret.vcenter_pass }}"
        validate_certs: "{{ common.validate_certs }}"
        datacenter: "{{ vm.vm_datacenter | default(common.vm_datacenter) }}"
        cluster:    "{{ vm.vm_cluster    | default(common.vm_cluster) }}"
        folder:     "{{ vm.vm_folder     | default(common.vm_folder) }}"
        name:       "{{ vm.hostname }}"
        template:   "{{ vm.vm_template   | default(osmap.os_templates[vm.os]) }}"
        state:      poweredon
        hardware:
          num_cpus:  "{{ vm.cpu }}"
          memory_mb: "{{ vm.mem_mb }}"
        disk:       "{{ vm.disks }}"
        networks:   "{{ vm.networks }}"
        customization:
          hostname:    "{{ vm.hostname }}"
          domain:      "{{ vm.domain_name }}"
          dns_servers: "{{ vm.dns_servers }}"
Run the playbook
Deploy the VM with:
ansible-galaxy collection install -r requirements.yml
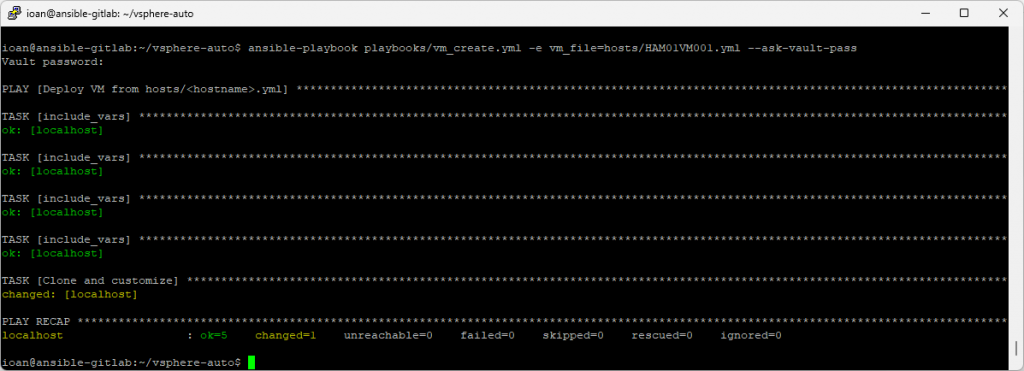
ansible-playbook playbooks/vm_create.yml -e vm_file=hosts/HAM01VM001.yml --ask-vault-passAnsible will prompt for the vault password, decrypt secret.yml at runtime, and use those credentials to talk to vCenter.
If all goes well, a new VM appears in vCenter, powered on with the correct hostname and IP.
Unfortunately we’ve encounter an error. Please check bellow.
Troubleshooting: “Why does my playbook fail on Ubuntu’s Ansible?”
When I first ran the playbook on a Ubuntu box, I hit this error:
fatal: [localhost]: FAILED! =>
  msg: Could not find imported module support code for ansible_collections.community.vmware.plugins.modules.vmware_guest.
       Looked for (['ansible.module_utils.compat.version.StrictVersion', 'ansible.module_utils.compat.version'])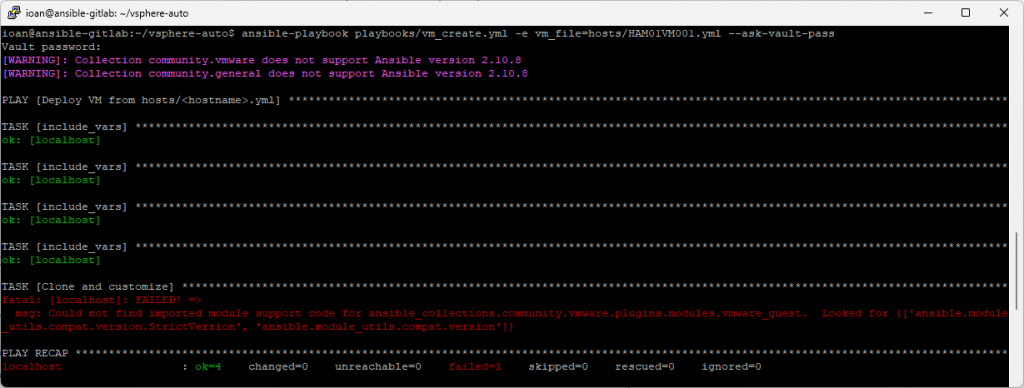
What’s going on?
- Ubuntu’s apt repository ships Ansible 2.10.x for many LTS releases. From Ubuntu’s point of view, that’s the latest they maintain for that distro.
- Modern VMware modules in
community.vmwareexpect a newer Ansible core (Ansible 8/9 era). - Result: the collection can’t import required utils from the old Ansible → the playbook stops.
Fix: Upgrade Ansible Version
I’ll use a modern Ansible just for my user (no system changes), then reinstall collections.
# Install a modern Ansible for my user
python3 -m pip install --user --upgrade "ansible==9.5.1"

# Ensure my shell uses it
echo 'export PATH="$HOME/.local/bin:$PATH"' >> ~/.bashrc
source ~/.bashrc
ansible --version   # should now show ansible-core 2.16/2.17 (Ansible 9.x)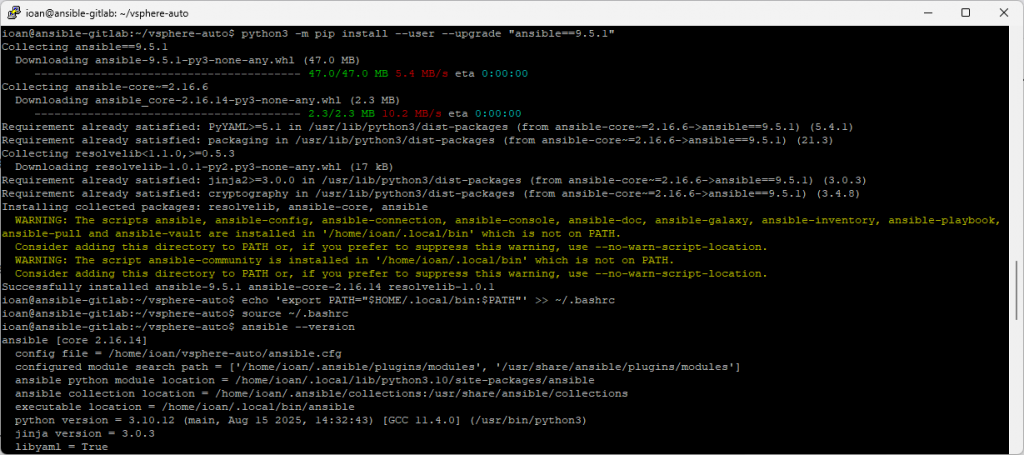
Fix collections versions
Update requirements.yml to pin one version of each collection:
collections:
  - name: community.vmware
    version: 4.2.0
  - name: community.general
    version: 9.2.0
Install them into the project dir (not user/system) and overwrite anything old there:
ansible-galaxy collection install -r requirements.yml -p ./collections --forceWe’ll tell Ansible to use a project-local collections dir. In ansible.cfg we add this line:
[defaults]
collections_path = ./collections
Run playbook again
Now my playbooks will resolve modules from the project-local ./collections:
ansible-playbook playbooks/vm_create.yml -e vm_file=hosts/HAM01VM001.yml --ask-vault-pass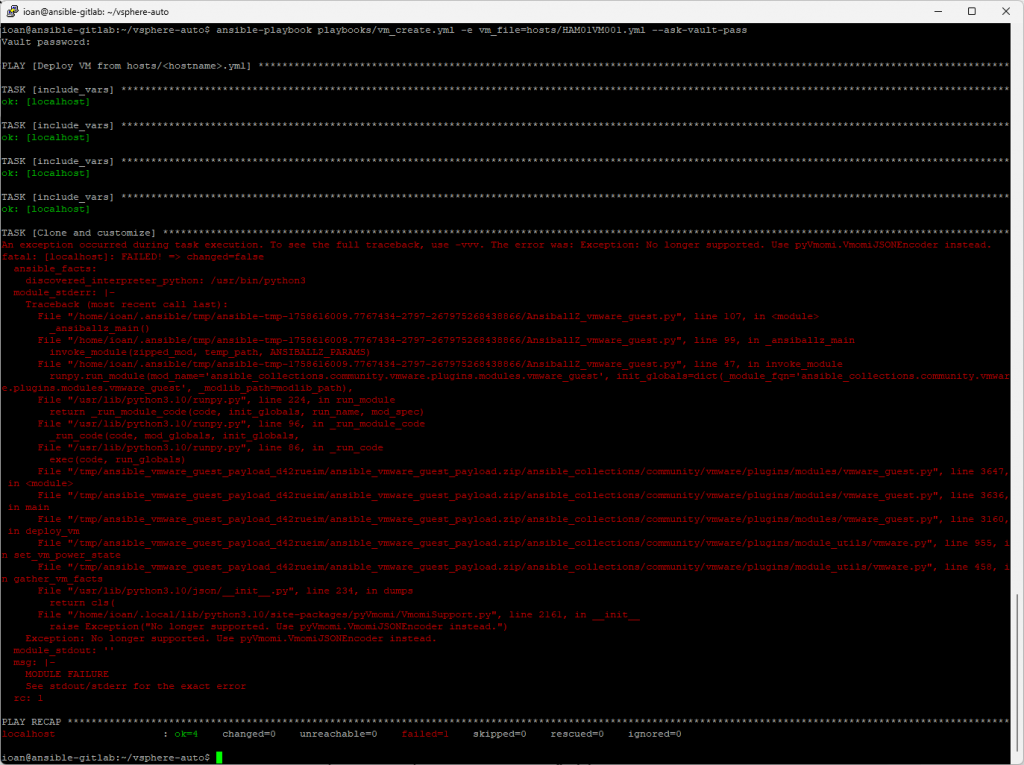
Fix the runtime error (pyVmomi JSON encoder)
It’s a version mismatch between the VMware collection and pyvmomi. My current pyVmomi is 9.0.0.0, which is exactly what triggers the exception with many community.vmware versions.
No longer supported. Use pyVmomi.VmomiJSONEncoder instead.
I’ll remove the current pyvmoni version and install an older one.
python3 -m pip uninstall -y pyvmomi
python3 -m pip install --user "pyvmomi==8.0.2"
python3 -c "import pkg_resources as pr; print('pyVmomi', pr.get_distribution('pyvmomi').version)"
# expect: pyVmomi 8.0.2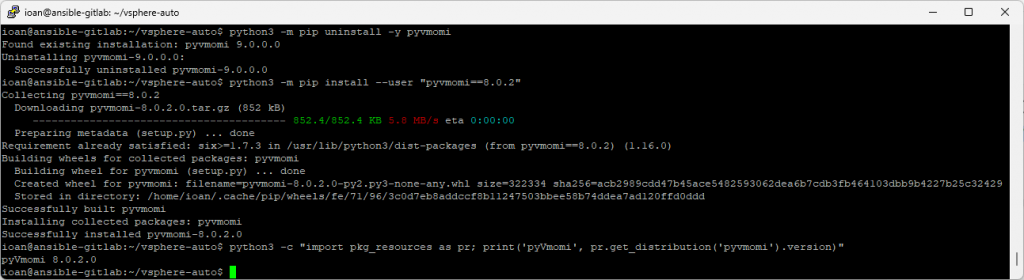
Run playbook one more time
Now we’ll run the Ansible playbook one more time:
ansible-playbook playbooks/vm_create.yml -e vm_file=hosts/HAM01VM001.yml --ask-vault-passAnd now we have successfully installed a new VM via Ansible.
Conclusion
In this part of the series, we built the foundation for automating VM deployments on vSphere with Ansible. We prepared the lab, installed Ansible, connected it to vCenter, and successfully deployed our first virtual machine from a template. Along the way, we also solved a common compatibility issue between pyVmomi and the VMware Ansible collection, showing how important it is to align tool versions in a reproducible way.
At this point, the environment is ready and tested:
- GitLab and GitLab Runner are installed.
- Ansible is configured locally, with working playbooks.
- VM creation has been validated end-to-end.
Next Post
In the next post, we’ll move beyond manual execution and integrate everything into GitLab CI/CD. That means automating VM deployments directly from a pipeline: pushing configuration changes to GitLab, letting the Runner execute the Ansible playbooks, and producing new VMs with no manual steps. We’ll begin with a simple job that deploys one VM, and gradually expand into multi-VM deployments and more advanced workflows.