
In the first two parts of this series, I focused on building the foundation of a smart holiday home hub.
In Part 1, I set up the hardware and base software stack: a Raspberry Pi 5 running Docker, Home Assistant, and Node-RED, designed to be compact, power-efficient, and easy to maintain remotely.
Part 2 expanded the system with real-world data. I integrated temperature and humidity sensors using a mix of local Bluetooth (BLE) and cloud-based APIs, wired everything through Node-RED and MQTT, and brought all sensor data into Home Assistant under a single, consistent dashboard.
With monitoring and visibility in place, the next step was to make the system more complete, more resilient, and accessible from anywhere.
Additional integrations – extending the system
Beyond sensors, I gradually added several practical integrations that turn monitoring into actual control and insight.
For climate control, I integrated a Cooper&Hunter air conditioner using the Gree Climate integration. This allows basic control and status visibility directly from Home Assistant, without relying on the vendor’s mobile app.
For energy awareness, I added Shelly devices to monitor electricity consumption. This gives real-time insight into power usage and lays the groundwork for future automations based on load or availability.
I also integrated two important devices that still rely on the Smart Life (Tuya) ecosystem:
– a radiant heating panel
– a depth / level sensor
Even though these entities are cloud-based, they fit cleanly into the overall system and are treated no differently than local devices once they appear in Home Assistant.
At this stage, the goal was not perfection or full local control, but practical coverage: visibility and control over all important systems in the house.
The Philosophy: Building for the “Worst Case”
In rural areas, the power grid and ISP reliability are often the weakest links. A minor surge trips a breaker, or a fiber line goes dark, and suddenly your “Smart Home” is just a collection of expensive, offline bricks. To solve this, I’ve implemented a layered defense strategy using a self-reclosing electrical breaker, 24-hour battery backup, and an intelligent Python-based network failover. For me, the priority is differentiation: I need to know if I’ve simply lost my internet connection or if the entire house has lost power.
This is critical because I have a pellet boiler that requires electricity to operate. Currently, the boiler isn’t on a UPS (that’s the next project), so knowing the power status is the difference between a warm house and a potential freeze-up.
The idea is simple: the house must survive on its own. If the power fluctuates, the house must restart itself. If the primary internet dies, the house must find another way to talk to me.
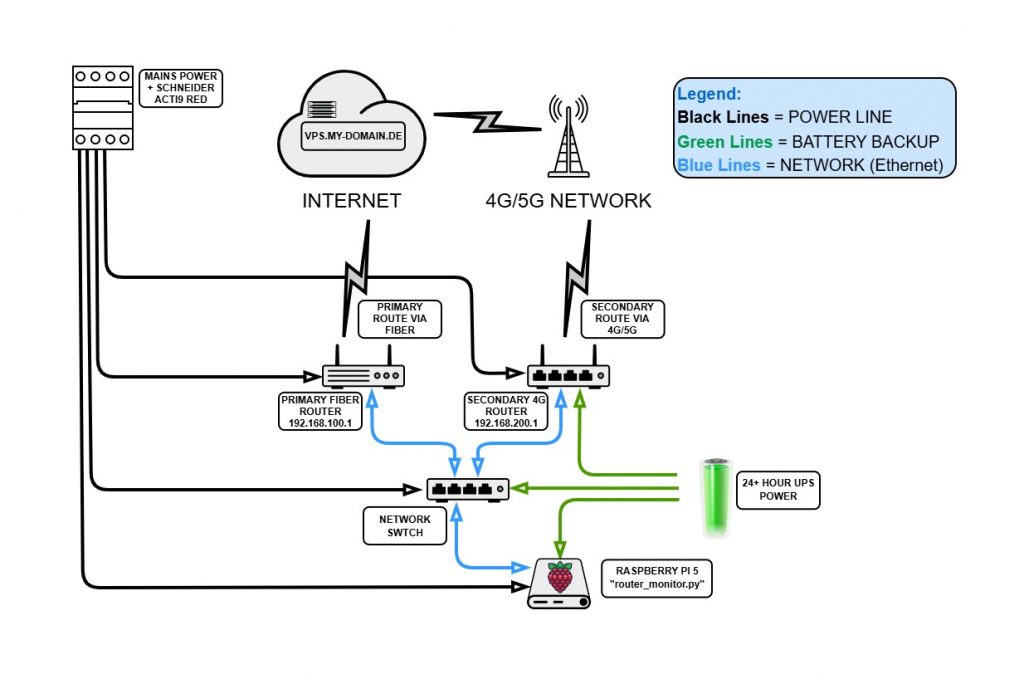
Section 1: The Hardware Guard – Schneider Acti9 RED
The most common failure point is the residual current device (RCD) tripping during a storm. Normally, that’s game over. To solve this, I installed the Schneider Acti9 RED (A9CR2225).

How it works: This isn’t just a breaker; it’s an intelligent recloser. When it detects a trip, it doesn’t just wait for a human. It performs a quick insulation check of the downstream circuit. If the fault was just a transient “hiccup” from a lightning strike or a surge, it mechanically re-arms itself.
This ensures the house power returns the second the grid is stable. To protect the electronics during these transitions, the Raspberry Pi 5, the network switch, and the 4G router are backed by a battery system with over 24 hours of autonomy. The “brain” of the house stays alive and continues to report data even while the boiler is temporarily offline.
Section 2: The Network Logic – Dual IPs and router_monitor.py
Connectivity follows the same philosophy. I have a primary Fiber link and a secondary 4G/5G router. My Raspberry Pi 5 uses a single ethernet port, but I’ve configured it with dual IP addresses:
- 192.168.100.100 (to talk to the Primary Fiber Router)
- 192.168.200.100 (to talk to the Secondary 4G Router)
This allows the Pi to stay in constant contact with both gateways. I wrote a custom Python watchdog to handle the “decision making.” It differentiates between a router failure and an ISP failure:
- Internal Link (
192.168.100.1): If this pings, the primary router is powered. - External Link (
8.8.8.8): If this pings, the fiber line is passing data.
If the external link fails but the internal is up, it’s an ISP issue. If both are down, I know the primary router (and likely the rest of the house) has lost power.
#!/usr/bin/env python3
import subprocess
import time
import signal
import sys
from pathlib import Path
from typing import Optional
import logging
from logging.handlers import RotatingFileHandler
import paho.mqtt.client as mqtt
from datetime import datetime
import os

# -----------------------------
# CONFIGURATION
# -----------------------------

INTERNAL_IP = "192.168.100.1"
EXTERNAL_IP = "8.8.8.8"

PRIMARY_GW = "192.168.100.1"
SECONDARY_GW = "192.168.200.1"
PRIMARY_IFACE = "eth0"

# Target for testing primary line while on backup
PRIMARY_TEST_IP = "1.1.1.1"

PING_TIMEOUT = 2
CHECK_INTERVAL = 30          # seconds between checks
FAIL_THRESHOLD = 6           # 3 minutes total
PRIMARY_OK_THRESHOLD = 6     # 3 minutes total

LOG_FILE = Path("/home/ioan/scripts/router_monitor.log")

# MQTT configuration
MQTT_ENABLED = True
MQTT_HOST = "192.168.100.100"
MQTT_PORT = 1883
MQTT_TOPIC_STATUS = "network/failover/status"
MQTT_TOPIC_LAST_SWITCH = "network/failover/last_switch"
MQTT_TOPIC_INTERNAL = "network/failover/internal_ok"
MQTT_TOPIC_EXTERNAL = "network/failover/external_ok"

MQTT_USER = os.getenv("MQTT_USER")
MQTT_PASS = os.getenv("MQTT_PASS")

# -----------------------------
# LOGGING SETUP
# -----------------------------

LOG_FILE.parent.mkdir(parents=True, exist_ok=True)
logger = logging.getLogger("router_monitor")
logger.setLevel(logging.INFO)
formatter = logging.Formatter("%(asctime)s %(message)s", "%Y-%m-%d %H:%M:%S")

file_handler = RotatingFileHandler(LOG_FILE, maxBytes=1_000_000, backupCount=5)
file_handler.setFormatter(formatter)
logger.addHandler(file_handler)

console_handler = logging.StreamHandler(sys.stdout)
console_handler.setFormatter(formatter)
logger.addHandler(console_handler)

def log_event(msg: str) -> None:
    logger.info(msg)

# -----------------------------
# MQTT FUNCTIONS
# -----------------------------

mqtt_client: Optional[mqtt.Client] = None

def mqtt_connect() -> None:
    """Connect to MQTT broker with auth."""
    global mqtt_client
    if not MQTT_ENABLED:
        return
    try:
        mqtt_client = mqtt.Client()
        if MQTT_USER and MQTT_PASS:
            mqtt_client.username_pw_set(MQTT_USER, MQTT_PASS)
            log_event("MQTT: Authenticating with user credentials")

        mqtt_client.connect(MQTT_HOST, MQTT_PORT, 60)
        mqtt_client.loop_start()
        log_event("MQTT: Connected to broker")
    except Exception as e:
        log_event(f"MQTT: Failed to connect: {e}")
        mqtt_client = None

def mqtt_publish(topic: str, payload: str, retain: bool = True) -> None:
    """Helper for MQTT publishing."""
    if MQTT_ENABLED and mqtt_client is not None:
        try:
            mqtt_client.publish(topic, payload, retain=retain)
        except Exception as e:
            log_event(f"MQTT: Publish error on {topic}: {e}")

def mqtt_publish_status(mode: str) -> None:
    """Publish current mode and switch timestamp."""
    mqtt_publish(MQTT_TOPIC_STATUS, mode)
    now = datetime.now().strftime("%Y-%m-%d %H:%M:%S")
    mqtt_publish(MQTT_TOPIC_LAST_SWITCH, now)
    log_event(f"MQTT: Mode '{mode}' and timestamp reported")

# -----------------------------
# NETWORK HELPERS
# -----------------------------

def ping(ip: str) -> bool:
    """Check reachability via current default route."""
    result = subprocess.run(
        ["ping", "-c", "1", "-W", str(PING_TIMEOUT), ip],
        stdout=subprocess.DEVNULL, stderr=subprocess.DEVNULL,
    )
    return result.returncode == 0

def get_default_gateway() -> Optional[str]:
    """Get active default gateway."""
    try:
        out = subprocess.check_output(["ip", "route", "show", "default"], text=True)
        parts = out.split()
        if "via" in parts:
            return parts[parts.index("via") + 1]
    except Exception as e:
        log_event(f"Routing error: {e}")
    return None

def set_default_route(gw: str) -> None:
    """Change route and restart tunnel service."""
    try:
        # 1. Update route
        subprocess.run(["ip", "route", "replace", "default", "via", gw, "dev", PRIMARY_IFACE], check=True                                                       )
        log_event(f"Default route changed to {gw}")

        # 2. Stop tunnel
        subprocess.run(["systemctl", "stop", "autossh.service"], check=False)

        # 3. Clear cache
        subprocess.run(["ip", "route", "flush", "cache"], check=False)
        time.sleep(2)

        # 4. Restart tunnel
        subprocess.run(["systemctl", "start", "autossh.service"], check=False)
        log_event("Autossh restarted for the new gateway")

        # 5. Notify HA
        mode = "primary" if gw == PRIMARY_GW else "secondary"
        mqtt_publish_status(mode)

    except subprocess.CalledProcessError as e:
        log_event(f"Failed to switch route: {e}")

def test_primary_internet() -> bool:
    """Check primary line while on secondary via temporary specific route."""
    try:
        subprocess.run(["ip", "route", "add", PRIMARY_TEST_IP, "via", PRIMARY_GW, "dev", PRIMARY_IFACE],                                                        check=False)
        return ping(PRIMARY_TEST_IP)
    finally:
        subprocess.run(["ip", "route", "del", PRIMARY_TEST_IP, "via", PRIMARY_GW, "dev", PRIMARY_IFACE],                                                        check=False)

# -----------------------------
# MAIN LOOP
# -----------------------------

mqtt_connect()
fail_count_primary = 0
primary_ok_count_on_secondary = 0
prev_internal_ok = None
prev_external_ok = None
prev_mode = None

log_event("Starting loop...")

while True:
    gw = get_default_gateway()
    current_mode = "primary" if gw == PRIMARY_GW else "secondary" if gw == SECONDARY_GW else "unknown"

    # Current connectivity checks
    internal_ok = ping(INTERNAL_IP)
    external_ok = ping(EXTERNAL_IP)

    # Always publish health status to MQTT sensors
    mqtt_publish(MQTT_TOPIC_INTERNAL, "ON" if internal_ok else "OFF")
    mqtt_publish(MQTT_TOPIC_EXTERNAL, "ON" if external_ok else "OFF")

    # Log changes
    if (internal_ok != prev_internal_ok or external_ok != prev_external_ok or current_mode != prev_mode):
        log_event(f"Status: INT={internal_ok}, EXT={external_ok}, Mode={current_mode}")
        if current_mode != prev_mode and current_mode != "unknown":
            mqtt_publish_status(current_mode)

        prev_internal_ok, prev_external_ok, prev_mode = internal_ok, external_ok, current_mode

    # Failover Logic
    if current_mode == "primary":
        if not (internal_ok and external_ok):
            fail_count_primary += 1
        else:
            fail_count_primary = 0

        if fail_count_primary >= FAIL_THRESHOLD:
            log_event("Primary WAN lost. Switching to SECONDARY.")
            set_default_route(SECONDARY_GW)
            fail_count_primary = 0

    elif current_mode == "secondary":
        if test_primary_internet():
            primary_ok_count_on_secondary += 1
        else:
            primary_ok_count_on_secondary = 0

        if primary_ok_count_on_secondary >= PRIMARY_OK_THRESHOLD:
            log_event("Primary WAN is back. Switching to PRIMARY.")
            set_default_route(PRIMARY_GW)
            primary_ok_count_on_secondary = 0

    time.sleep(CHECK_INTERVAL)
Script Breakdown: The “Brain” of the Failover
The script is essentially a persistent watchdog that manages my system’s routing table based on real-time health checks. Here is how it’s structured:
1. Configuration & Logging
The script starts by defining my “source of truth”: IP addresses for the Primary and Secondary gateways, check intervals (30 seconds), and MQTT topics. It uses RotatingFileHandler for logging, which is a professional touch—it prevents the log file from eating up my disk space by overwriting old entries.
2. MQTT Communication Layer
This section handles the “talk” with Home Assistant. It connects to my broker using credentials stored in environment variables (for security). It doesn’t just send the current status; it also sends a timestamp of the Last Network Switch, which is invaluable for debugging when exactly a provider went down.
3. Network Helpers (The “Check” Phase)
Here we have the low-level functions:
ping: A simple reachability test.set_default_route: This is the “heavy lifter.” It usesip route replaceto swap gateways and restarts the autossh service, ensuring your remote tunnel is re-established on the new link.test_primary_internet: A clever function that adds a temporary, specific route to check if the Fiber is back online while the system is still technically using the 4G backup.
4. The Main Loop (The “Decision” Phase)
This is an infinite while True loop that runs every 30 seconds. It follows a simple logic flow:
- Monitor: Ping the internal router and external internet (8.8.8.8).
- Report: Update MQTT sensors so Home Assistant stays in the loop.
- Failover: If the Primary fails for 6 consecutive checks (3 minutes), it triggers the switch to 4G.
- Failback: If it’s on 4G and sees the Primary Fiber has been stable for 3 minutes, it gracefully switches back to the main line.
Making it Permanent: The Systemd Service
For a failover system to be reliable, it needs to be a first-class citizen of the operating system. We don’t want to run this script manually; we want it to breathe with the Raspberry Pi. I configured it as a systemd service to ensure it starts as soon as the network is online and restarts itself if anything goes wrong.
The Service Configuration Create the file at /etc/systemd/system/router-monitor.service:
[Unit]
Description=Started connection monitoring and 5G router relay control (User=root)
After=network-online.target
Wants=network-online.target

[Service]
Type=simple
User=root
WorkingDirectory=/home/ioan/scripts
ExecStart=/usr/bin/python3 /home/ioan/scripts/router_monitor.py
Restart=on-failure
RestartSec=5
Environment=PYTHONUNBUFFERED=1
Environment="MQTT_USER=homeauto"
Environment="MQTT_PASS=My_Secure_Password"

[Install]
WantedBy=multi-user.target
Why this specific setup works:
- User=root: Necessary because the script needs permission to modify the kernel routing table.
- After=network-online.target: We wait until the OS confirms networking is up before we start trying to ping the world.
- PYTHONUNBUFFERED=1: This ensures our Python
printandloggingstatements are sent immediately to the system logs, which is vital for remote debugging. - Restart=on-failure: If the script crashes, systemd will try to bring it back every 5 seconds.
Activation To get this “guardian” running, use the standard systemd commands:
sudo systemctl daemon-reload
sudo systemctl enable router-monitor.service
sudo systemctl start router-monitor.service
Now, from 2,000km away, I can simply type journalctl -u router-monitor.service -f and watch my network’s heartbeat in real-time.
Section 3: The Secret Backdoor – Reverse SSH Tunneling
When the system pivots to 4G, you face the “hidden host” problem. Mobile providers almost never give you a public IP. To maintain access, I don’t try to connect to the house; I have the house connect to me.
I use AutoSSH to maintain a persistent reverse tunnel to a public VPS. This creates a bridge that stays open regardless of which router is currently providing the internet.
1. Why autossh?
Standard SSH is fragile. If the connection blinks during the switch from Fiber to 4G, the process just sits there, orphaned. autossh is a watchdog; it monitors the connection and, if it fails, it kills the old process and starts a new one immediately.
2. The Service Configuration
I configured this as a dedicated systemd service. It’s “failover-friendly” because it’s designed to reconnect quickly the moment the new gateway becomes active.
The Service File (/etc/systemd/system/autossh-reverse.service):
[Unit]
Description=AutoSSH reverse tunnels to VPS (failover-friendly)
After=network-online.target
Wants=network-online.target

[Service]
User=ioan

# Force quick reconnection
Environment="AUTOSSH_GATETIME=0"
Environment="AUTOSSH_POLL=20"
Environment="AUTOSSH_FIRST_POLL=20"

ExecStart=/usr/bin/autossh \
  -M 20000:20001 \
  -N \
  -o ServerAliveInterval=15 \
  -o ServerAliveCountMax=2 \
  -o ExitOnForwardFailure=yes \
  -o IdentitiesOnly=yes \
  -o StrictHostKeyChecking=no \
  -i /home/ioan/.ssh/id_ed25519 \
  -R 3334:localhost:8123 \
  -R 3333:localhost:22 \
  root@vps.my-domain.de

Restart=always
RestartSec=10

[Install]
WantedBy=multi-user.target
3. Why this works for us
- Dual Port Forwarding: * Port 3333 maps to the Pi’s SSH (Port 22). I can log in from anywhere by connecting to the VPS on port 3333.
- Port 3334 maps to the Home Assistant Web UI (Port 8123). Even if the standard cloud access fails, I have a direct path to the dashboard.
- Aggressive Monitoring:
AUTOSSH_POLL=20andServerAliveInterval=15ensure that the tunnel doesn’t stay dead for more than a few seconds. - The “Relay” Logic: In my
router_monitor.pyscript, I trigger asystemctl restart autossh-reverse.service. This forces the tunnel to drop the “zombie” session from the old ISP and immediately re-establish itself over the new 4G route.
4. Security: Passwordless Authentication
For autossh to work as a background service, it cannot prompt for a password. I used SSH Key-based Authentication to establish a trusted relationship between the Raspberry Pi and the VPS.
The Setup:
- Generate the key on the Pi:
ssh-keygen -t ed25519(using Ed25519 for better security and performance). - Transfer the public key to the VPS:
ssh-copy-id -i ~/.ssh/id_ed25519.pub root@vps.my-domain.de.
Now, the Pi can “talk” to the VPS securely and automatically, which is exactly what we need for a service that must survive a reboot or a network failover without human intervention.
5. Critical VPS Side Configuration
Creating the tunnel from the Pi is only half the battle. By default, SSH tunnels only listen on the VPS’s loopback interface (127.0.0.1). If you want to access your Home Assistant from the public internet using vps.my-domain.de:3334, you need to tweak the VPS.
A. The SSH Daemon Config Edit /etc/ssh/sshd_config on your VPS and ensure this line is set:
GatewayPorts yesWhy? Without GatewayPorts yes, the VPS will only allow connections to ports 3333 and 3334 from inside the VPS itself. This setting tells SSH to bind these ports to all interfaces, making them accessible from the outside world.
Don’t forget to restart the service: sudo systemctl restart ssh (sau sshd).
B. The Firewall (ufw/iptables) Your VPS firewall will block these ports by default. You must explicitly open them:
sudo ufw allow 3333/tcp
sudo ufw allow 3334/tcp
Section 4: Home Assistant – The Command Center
Now that we have power (Schneider RED), routing (Python), and access (AutoSSH) secured, we finally have a dashboard we can trust. I’ve mapped these network states into Home Assistant so I can monitor the infrastructure health from my Pixel 9 Pro XL.
This setup gives me three critical data points: Is the LAN up? Is the WAN up? And which route are we currently using? I need to see exactly what is happening so I can make decisions—whether that’s calling for local help or simply knowing I can relax.
I’ve added the following sensors to my already existing sensor list in configuration.yaml
--------------------
    # Track which gateway is active (Primary vs Secondary)
    - name: "Raspberry Pi Internet Route"
      state_topic: "network/failover/status"
      unique_id: "rpi5_network_route"
      icon: "mdi:router-network"
      value_template: "{{ value | capitalize }}"

    # Timestamp of the last routing change
    - name: "Last Network Switch"
      state_topic: "network/failover/last_switch"
      unique_id: "rpi5_last_switch"
      icon: "mdi:clock-outline"

  binary_sensor:
    # Visual status of the failover system
    - name: "Internet Backup Active"
      state_topic: "network/failover/status"
      payload_on: "secondary"
      payload_off: "primary"
      device_class: connectivity
      unique_id: "rpi5_failover_binary"

    # Status of the Primary Router (LAN reachability)
    - name: "Primary Router Status"
      state_topic: "network/failover/internal_ok"
      payload_on: "ON"
      payload_off: "OFF"
      device_class: connectivity
      unique_id: "rpi5_primary_router_lan"

    # Status of the Internet (WAN reachability via Primary Line)
    - name: "Primary Internet Status"
      state_topic: "network/failover/external_ok"
      payload_on: "ON"
      payload_off: "OFF"
      device_class: connectivity
      unique_id: "rpi5_primary_internet_wan"
Why this matters for a remote home:
- Diagnostic Precision: If “Primary Router Status” is OFF, I know the fiber router is unpowered. If only “Primary Internet Status” is OFF, I know the ISP is having an outage, but my hardware is fine.
- The Switch History: Knowing the exact time of the Last Network Switch allows me to correlate outages with weather events or power fluctuations reported by the village.
- Visual Confidence: On my Pixel 9 Pro XL, the
device_class: connectivityensures that I see clear, color-coded indicators. Green means “Primary/Stable”; Amber means “Backup Active.”
Section 5: Putting Data to Work – Home Assistant Automations
Monitoring is only half the battle. The true power of this setup lies in its ability to turn data into proactive alerts. I’ve configured several key automations in Home Assistant to ensure I’m never guessing about the state of the remote house.
automations.yaml
- id: '1762986200717'
  alias: Alarm Boiler Room
  description: The temperature in the boiler room has dropped below 10°C.
  triggers:
  - trigger: numeric_state
    entity_id:
    - sensor.cobor_centrala_temperature
    for:
      hours: 0
      minutes: 2
      seconds: 0
    below: 10
  conditions: []
  actions:
  - action: notify.mobile_app_pixel_9_pro_xl
    metadata: {}
    data:
      message: The temperature in the boiler room has dropped below 10°C.
      title: ❄️ Temperature Boiler Room
  - action: persistent_notification.create
    metadata: {}
    data:
      message: The temperature in the boiler room has dropped below 10°C.
      title: ❄️ Temperature Boiler Room
  mode: single
- id: network_failover_notification
  alias: Network Failover Alert
  description: Alerts when the system switches to backup internet
  triggers:
  - entity_id: binary_sensor.internet_backup_active
    from: 'off'
    to: 'on'
    trigger: state
  conditions: []
  actions:
  - data:
      title: ⚠️ Network Failover
      message: 'Primary WAN is down. Switched to backup router (4G/5G). Router LAN:
        {{ ''OK'' if is_state(''binary_sensor.primary_router_status'', ''on'') else
        ''FAIL'' }} Internet WAN: {{ ''OK'' if is_state(''binary_sensor.primary_internet_status'',
        ''on'') else ''FAIL'' }}

        '
    action: notify.persistent_notification
  - action: notify.mobile_app_pixel_9_pro_xl
    metadata: {}
    data:
      message: Primary WAN is down. Switched to backup router (4G/5G).
      title: ⚠️ Network Failover
  mode: single
- id: network_failback_notification
  alias: Network Failback Alert
  description: Alerts when the system switches back to primary internet
  triggers:
  - entity_id: binary_sensor.internet_backup_active
    from: 'on'
    to: 'off'
    trigger: state
  actions:
  - data:
      title: ✅ Network Restored
      message: Primary internet connection is stable. Switched back to main router.
    action: notify.persistent_notification
  - action: notify.mobile_app_pixel_9_pro_xl
    metadata: {}
    data:
      title: ✅ Network Restored
      message: Primary internet connection is stable. Switched back to main router.
  mode: single
1. The Frost Sentinel (Boiler Room Alarm)
If the temperature in the boiler room drops below 10°C for more than 2 minutes, the system triggers a critical alert. This is my early warning that the pellet boiler has stopped, allowing me to investigate before the pipes are at risk of freezing.
2. Network Transition Intelligence
When the router_monitor.py script triggers a failover, Home Assistant doesn’t just tell me the internet is on backup; it provides a diagnostic report. Using Jinja2 templates, the notification tells me if the local Fiber router is completely unpowered (LAN FAIL) or if it’s just an ISP outage (WAN FAIL).
3. Redundancy in Notifications
For every critical event, I use a dual-action approach:
- Mobile Push Notifications: Instant alerts on my Pixel 9 Pro XL for immediate action.
- Persistent Notifications: These stay visible in the Home Assistant sidebar until I manually dismiss them, serving as a log of events for when I next log in to the dashboard.
Conclusion: Autonomy for Awareness
This setup isn’t about over-engineering for the sake of it; it’s about building a system that can manage itself while keeping me informed. By combining the Schneider RED for power recovery, a 24h battery buffer, and the Systemd-managed services, I’ve created a resilient hub. I no longer have to wonder about the state of the house—the logs and sensors give me the clarity I need to manage it effectively from any distance.
What’s next? Now that the network and power brain are solid, I’m looking at the pellet boiler. Beyond just adding a UPS for longer blackouts, I’m starting to investigate the possibility of tapping into the boiler’s serial port. The goal would be to extract real-time operational data directly from the source. I can’t promise a tutorial on that just yet—it involves some deep digging into protocols—but if I manage to “crack the code,” it will definitely be the next chapter in this series.
Recommended remediation plan : Remove public exposure of HA and Pi SSH
Replace with WireGuard/Tailscale, or keep reverse SSH but bind on VPS localhost only (no GatewayPorts yes).
Fix SSH trust + reduce VPS blast radius
Remove StrictHostKeyChecking=no.
Stop using root@vps; use a restricted user and constrained key options.
Eliminate “root executes from /home”
Move router_monitor.py into root-owned directory with locked-down permissions.
Move secrets out of unit files
Use EnvironmentFile= with strict permissions or systemd credentials; rotate the MQTT password.
Harden MQTT and Node-RED
Auth + ACLs for MQTT; ensure Node-RED is not exposed unauthenticated; firewall internal ports.
Thanks for the feedback. This is absolute gold and exactly the kind of peer review I value. 🙂 I’m already working on implementing these measures across the setup. Appreciate you taking the time to break this down.