
In the last post I proved the flow locally: Ansible talks to vCenter, clones from a template, and the VM comes up with our settings. That was the “manual gear.” Now I want the “automatic gear”—a GitLab pipeline that runs the same steps for me, consistently, from any commit. My goals are simple: keep secrets out of the repo, install the right tooling inside the job (so it works on any runner), and support both deploy one VM and deploy everything.
Below is exactly how I wired it up.
Prepare Git Repo
1. Create the GitLab project
In GitLab UI: New project → Create blank project
I named it vsphere-auto. I’ll get a URL like:
- SSH: git@gitlab.racklab.local:root/vsphere-auto.git
- HTTP: http://gitlab.racklab.local/root/vsphere-auto.git
2. Set up SSH access
On the Ubuntu Linux machine, I’ll generate a ssh key, without passphrase:
# generate a key (press Enter for defaults)
ssh-keygen -t ed25519 -C "ioan@racklab"
cat ~/.ssh/id_ed25519.pub
Copy the public key to GitLab: User → Preferences → SSH Keys → Add key.
Test connection.
ssh -T git@gitlab.racklab.local
3. Initialize Git in my local folder
From my local project root (~/vsphere-auto):
git init
git switch -c main
git config user.name "Ioan"
git config user.email "ioan@racklab.local"
4. We’ll add a .gitignore file to avoid commiting junk/secrets
We’ll add the file locally, in the ansible repo root.
# Ansible artifacts
*.retry
.cache/

# Local secrets (never commit your Vault password file)
vault.pass

# Optional: vendor dir for collections (we reinstall in CI)
collections/

# Python noise (if any helper scripts)
__pycache__/
*.pyc

# Editor/OS crumbs
.DS_Store
.vscode/
.idea/
5. Add the remote repository
git remote add origin git@gitlab.racklab.local:root/vsphere-auto.git
git remote -v
6. Start from the remote main and create a feature branch
git fetch origin
git pull --rebase origin main
git switch -c init-repo origin/main # new branch starting from remote main
7. Add my files and commit locally
git add .
git commit -m "Initial commit: Ansible + vSphere automation"
8. Push the feature branch
git push -u origin init-repo9. Open a Merge Request (GitLab will show the link in the push output)
10. Merge into main (requires permissions)
11. After merge, update my local main
git switch main
git pull --ff-only origin main
12. Delete the local feature branch
git branch -D init-repoBuilding the GitLab CI/CD Pipeline for Ansible
Now that our GitLab Runner is properly installed and registered and the project files are availabe in GitLab, we can connect everything together with a very simple pipeline. The goal at this stage is not to automate the full VM lifecycle yet, but to verify that:
- the runner is available and can execute jobs
- Ansible and its VMware dependencies can be installed in the job environment
- a playbook from our repository can be executed through GitLab CI/CD.
Build a simple Pipeline
This minimal pipeline gives us a solid foundation. Once it runs successfully, we can extend it step by step to deploy and configure VMs in vSphere.
This is the pipeline: .gitlab-ci.yml
stages:
  - deploy

# install exact tooling + collections, then run a playbook
deploy:run:
  stage: deploy
  tags: [vmware]
  before_script:
    - python3 -m pip install --upgrade pip
    - python3 -m pip install "ansible==9.5.1" "pyvmomi==8.0.2" requests netaddr
    - ansible-galaxy collection install -r requirements.yml -p ./collections --force

  script:
    # show versions after install
    - ansible --version
    - python3 -m pip show pyvmomi
    - ansible-galaxy collection list | sed -n '1,80p'
    # run your playbook
    - ansible-playbook -i 'localhost,' -c local playbooks/test_local.yml -v
This is the test playbook – test_local.yml
---
- name: test against localhost
  hosts: localhost
  gather_facts: false
  tasks:
    - name: show ansible version
      ansible.builtin.command: ansible --version
      register: out
The playbook was executed successfully and the job succeeded. Now it’s time to move further.
Build a VM Deploy Pipeline
Now that we are sure that all our components are working properly, let’s build the whole puzzle.
1. New Ansible Playbook for CI/CD
We will edit now the playbook and the pipeline that will deploy the VM. Because the CI/CD will not use anymore the information from secret.yml, we will remove its reference from pre_tasks and we also remove explicit username/password/hostname fields from the vmware_guest task. The following workbook will result.
---
- name: Deploy VM from hosts/<hostname>.yml
  hosts: localhost
  connection: local
  gather_facts: false
  collections: [community.vmware]

  pre_tasks:
    - include_vars: { file: "{{ playbook_dir }}/../vars/common.yml", name: common }
    - include_vars: { file: "{{ playbook_dir }}/../templates/os_map.yml", name: osmap }
    - include_vars: { file: "{{ playbook_dir }}/../{{ vm_file }}", name: vm }

  tasks:
    - name: Clone and customize
      community.vmware.vmware_guest:
        # hostname, username, password, validate_certs are read from CI/CD var: VMWARE_*
        datacenter: "{{ vm.vm_datacenter | default(common.vm_datacenter) }}"
        cluster:    "{{ vm.vm_cluster    | default(common.vm_cluster) }}"
        folder:     "{{ vm.vm_folder     | default(common.vm_folder) }}"
        name:       "{{ vm.hostname }}"
        template:   "{{ vm.vm_template   | default(osmap.os_templates[vm.os]) }}"
        state:      poweredon
        hardware:
          num_cpus:  "{{ vm.cpu }}"
          memory_mb: "{{ vm.mem_mb }}"
        disk:       "{{ vm.disks }}"
        networks:   "{{ vm.networks }}"
        customization:
          hostname:    "{{ vm.hostname }}"
          domain:      "{{ vm.domain_name }}"
          dns_servers: "{{ vm.dns_servers }}"
2. Repository files
vars/secret.ymlcould be deleted completely, or keep it only for local/manual runs (but not used in CI).- keep
vars/common.yml(it still provides cluster/datacenter/folder defaults). - keep
templates/os_map.ymland thehosts/<VM>.ymldefinitions as they are.
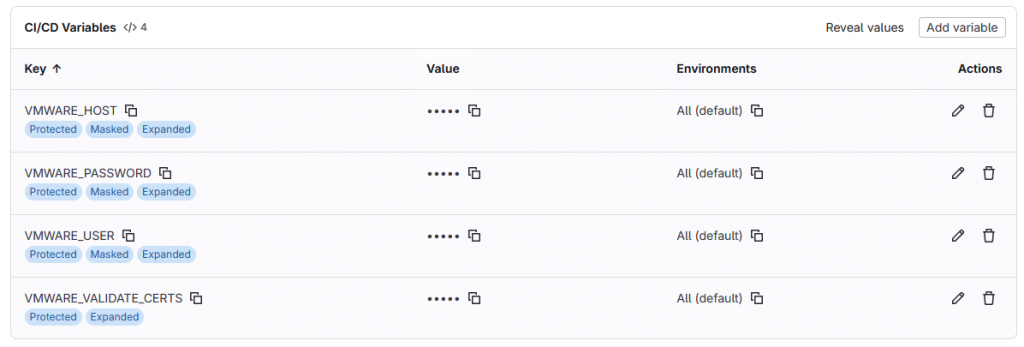
3. GitLab CI/CD
We will add these variables in the project’s CI/CD settings.
-
VMWARE_HOST VMWARE_USER- VMWARE_PASSWORD
VMWARE_VALIDATE_CERTS(usually"false"if vCenter uses self-signed certs)
4. New CI/CD Pipeline
Here is the .gitlab-ci.yml that uses my VMWARE_* CI/CD variables and runs the VM deploy playbook. We also add a syntax check to the new pipeline and add one test stage. Because the changes are pushed from a feature branch and then merged in the main branch, we introduced the following behavior – feature branches only do a fast syntax check, and the full VM deploy runs only on main branch.
stages:
  - test
  - deploy

# Run on any branch EXCEPT main (e.g., feature/MR branches)
test:syntax:
  stage: test
  tags: [vmware]
  rules:
    - if: '$CI_COMMIT_BRANCH != "main"'
  script:
    - python3 -m pip install --upgrade pip
    - python3 -m pip install "ansible==9.5.1"
    - ansible-playbook --syntax-check playbooks/vm_create.yml

# Full deploy ONLY on main (after merge)
deploy:vm-create:
  stage: deploy
  tags: [vmware]
  rules:
    - if: '$CI_COMMIT_BRANCH == "main"'
  variables:
    ANSIBLE_STDOUT_CALLBACK: yaml
  before_script:
    - python3 -m pip install --upgrade pip
    - python3 -m pip install "ansible==9.5.1" "pyvmomi==8.0.2" requests netaddr
    - ansible-galaxy collection install -r requirements.yml -p ./collections --force
  script:
    - ansible --version
    - python3 -m pip show pyvmomi
    - ansible-galaxy collection list | sed -n '1,80p'
    - ansible-playbook playbooks/vm_create.yml -e "vm_file=hosts/HAM01VM001.yml" -v
How it behaves:
- no vault password or secret.yml needed anymore.
- CI/CD jobs stay simple: Ansible will read vCenter connection info directly from environment variables.
- push/MR to a feature branch → only
test:syntaxruns. - merge to
main→ onlydeploy:vm-createruns.
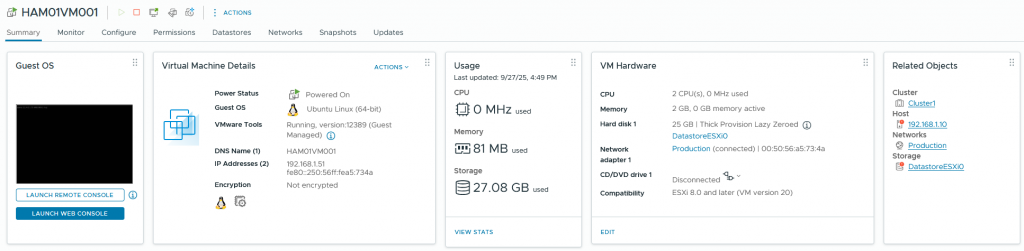
VM deployed
As you can see, we have deployed successfully the VM. Mission accomplished.
Pipeline Auto-Deploy
Let’s make the pipeline to auto-deploy when a NEW host file appears under hosts/*.yml, and ignore edits to existing ones.
In order to do that, we’ll tweak the CI job to:
- run only when something under hosts/*.yml changed
- inside the job, detect files that were added (not modified) in this commit and run the playbook once per new file
stages: [test, deploy]

# feature branches: validate only changed host files
test:hosts:
  stage: test
  tags: [vmware]
  rules:
    - if: '$CI_COMMIT_BRANCH != "main"'
      changes: [hosts/*.yml]
  script:
    - python3 -m pip install --upgrade pip
    - python3 -m pip install "ansible==9.5.1"
    - |
      set -e
      # Added or Modified host files in this change
      if [ -z "$CI_COMMIT_BEFORE_SHA" ] || [ "$CI_COMMIT_BEFORE_SHA" = "0000000000000000000000000000000000000000" ]; then
        CHANGED_HOSTS=$(git diff-tree --no-commit-id --name-only --diff-filter=AM -r "$CI_COMMIT_SHA" -- 'hosts/*.yml')
      else
        CHANGED_HOSTS=$(git diff --name-only --diff-filter=AM "$CI_COMMIT_BEFORE_SHA" "$CI_COMMIT_SHA" -- 'hosts/*.yml')
      fi
      [ -z "$CHANGED_HOSTS" ] && echo "no host files changed" && exit 0
      for file in $CHANGED_HOSTS; do
        echo "syntax-check with vm_file=$file"
        ansible-playbook --syntax-check playbooks/vm_create.yml -e "vm_file=$file"
      done

# main branch: deploy only when new host files are added
deploy:auto-vm-create:
  stage: deploy
  tags: [vmware]
  rules:
    - if: '$CI_COMMIT_BRANCH == "main"'
      changes: [hosts/*.yml]
  before_script:
    - python3 -m pip install --upgrade pip
    - python3 -m pip install "ansible==9.5.1" "pyvmomi==8.0.2" requests netaddr
    - ansible-galaxy collection install -r requirements.yml -p ./collections --force || echo "no requirements.yml, skipping"
  script:
    - |
      set -e
      # Newly Added host files in this change
      if [ -z "$CI_COMMIT_BEFORE_SHA" ] || [ "$CI_COMMIT_BEFORE_SHA" = "0000000000000000000000000000000000000000" ]; then
        NEW_HOSTS=$(git diff-tree --no-commit-id --name-only --diff-filter=A -r "$CI_COMMIT_SHA" -- 'hosts/*.yml')
      else
        NEW_HOSTS=$(git diff --name-only --diff-filter=A "$CI_COMMIT_BEFORE_SHA" "$CI_COMMIT_SHA" -- 'hosts/*.yml')
      fi
      [ -z "$NEW_HOSTS" ] && echo "no newly added host files → nothing to deploy" && exit 0
      for vmfile in $NEW_HOSTS; do
        echo "deploying VM from $vmfile"
        ansible-playbook playbooks/vm_create.yml -e "vm_file=$vmfile" -v
      done
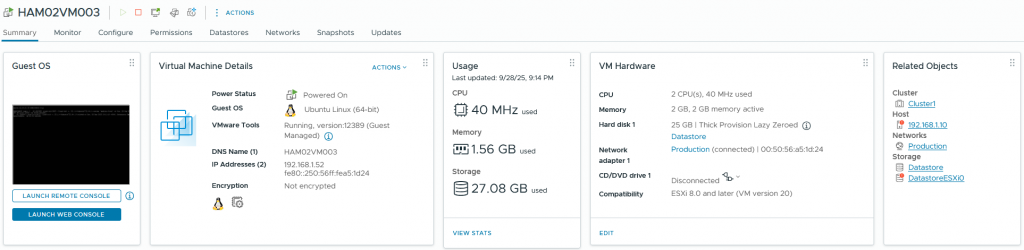
We have added two new files in hosts – BER01VM005.yml and HAM02VM003.yml and pushed.
hostname: "BER01VM005"
os: "centos9"

cpu: 2
mem_mb: 2048

disks:
  - size_gb: 30
    type: thin
    datastore: "Datastore"

networks:
  - name: "Production"
    type: static
    ip: "192.168.1.53"
    netmask: "255.255.255.0"
    gateway: "192.168.1.1"

dns_servers: ["192.168.1.1", "1.1.1.1"]
domain_name: "racklab.local"
hostname: "HAM02VM003"
os: "ubuntu22"

cpu: 2
mem_mb: 2048

disks:
  - size_gb: 25
    type: thin
    datastore: "Datastore"

networks:
  - name: "Production"
    type: static
    ip: "192.168.1.52"
    netmask: "255.255.255.0"
    gateway: "192.168.1.1"

dns_servers: ["192.168.1.1", "1.1.1.1"]
domain_name: "racklab.local"
After a few minutes both VMs were deployed successfully.

Conclusion
With this setup, we built a working GitLab CI/CD pipeline that connects Ansible to vCenter. By simply adding a new host definition file to the repository, a VM is automatically created in vSphere. This makes VM deployment repeatable, auditable, and version-controlled.
But this is only the beginning. From here, you can go much further:
- Update flow – Detect modified host files and apply changes to CPU, memory, disks, or networks.
- Delete flow – Remove VMs automatically when a host file is deleted from the repo (full GitOps lifecycle).
- Linting & validation – Enforce structure and best practices in host files with Yamllint or Ansible-lint.
- Environments – Extend the pipeline to multiple vCenters (Dev, Stage, Prod) with environment-specific rules.
- Parallel jobs – Create VMs faster by spawning one job per host file instead of a sequential loop.
- Self-service portal – Integrate with GitLab UI or a simple frontend so that other teams can request VMs by creating host files without touching Ansible.
This foundation already saves time and reduces manual work. Each next step brings you closer to a fully automated, GitOps-style VMware infrastructure.