
“ESXi Packet Loss Troubleshooting with iPerf3 and pktcap-uw”
- Part 1: Baseline Testing and Setup
- Part 2: Capturing UDP Traffic Under Different CPU Loads
- Part 3: Analyzing Packet Loss with Wireshark
- Part 4: UDP Loss from Link Flapping and Network Instability ← You are here
- Part 5: Inter-VLAN UDP Loss Caused by Bandwidth Limits
While previous scenarios focused on CPU stress and normal transmission conditions, this scenario simulates a more disruptive condition — a flapping connection. In many real-world environments, intermittent link failures or unstable uplinks can result in seemingly random packet loss, session resets, or erratic application behavior. By intentionally introducing link flaps, we can observe how UDP traffic behaves when connectivity is interrupted and quickly restored.
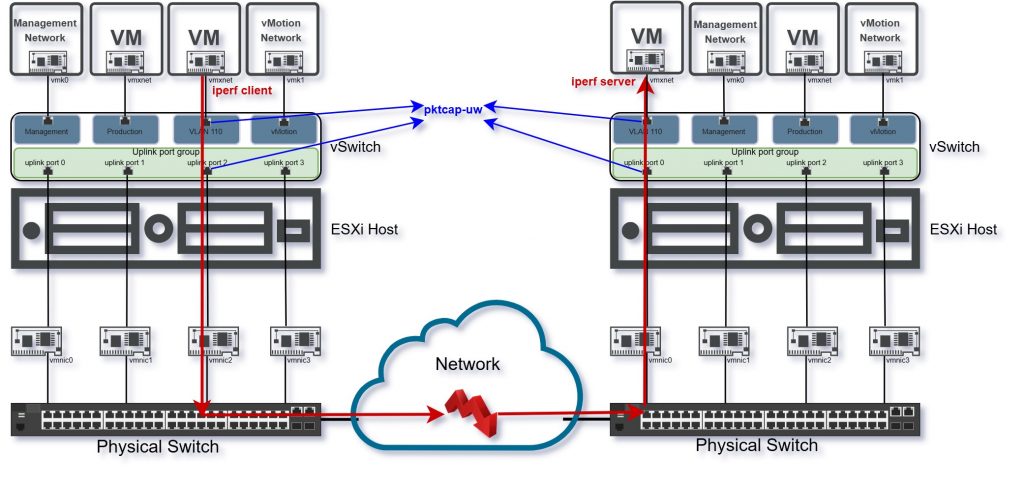
Lab Setup Recap
Sending VM: 192.168.110.101 (VLAN 110)
- Receiving VM: 192.168.110.103 (VLAN 110)
- Link Instability Simulation: Interface flapping (e.g., disconnecting the link between phisycal switches a few times)
- Traffic Generator: iPerf3 using UDP, sustained for 300 seconds
Scenario 3: Packet Loss Due to Flapping Connection
Goal: To simulate and analyze how intermittent network link disruptions affect UDP packet transmission between two VMs on the same subnet.
Method:
- Run continuous UDP traffic from sender to receiver at 5 Mbps using iPerf3.
- Manually introduce 1–3 short connection outages (e.g., disable and re-enable the vmnic or port group or disconnect the link between phisycal switches a few times).
- Capture traffic with pktcap-uw and monitor iPerf3 output and Wireshark traces for signs of packet loss or jitter.
Expected Outcome:
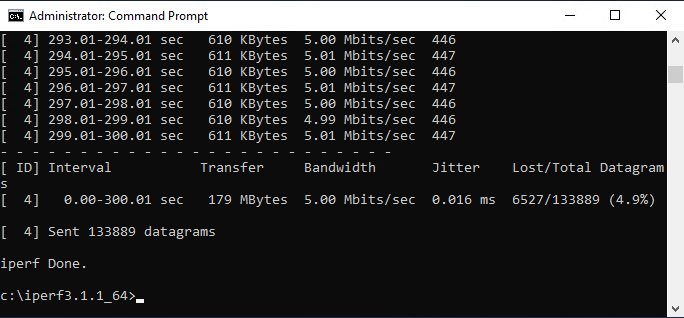
- UDP packets will be lost during each link-down event.
- iPerf3 will show high packet loss and possible jitter spikes.
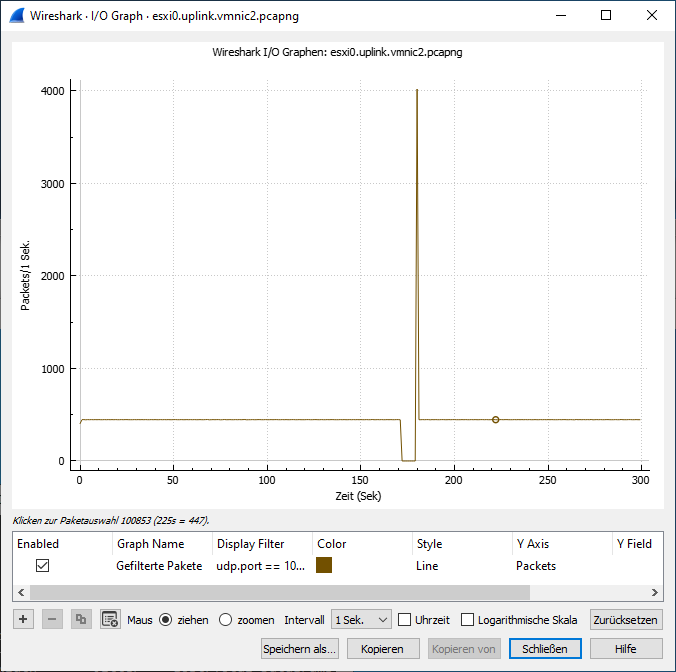
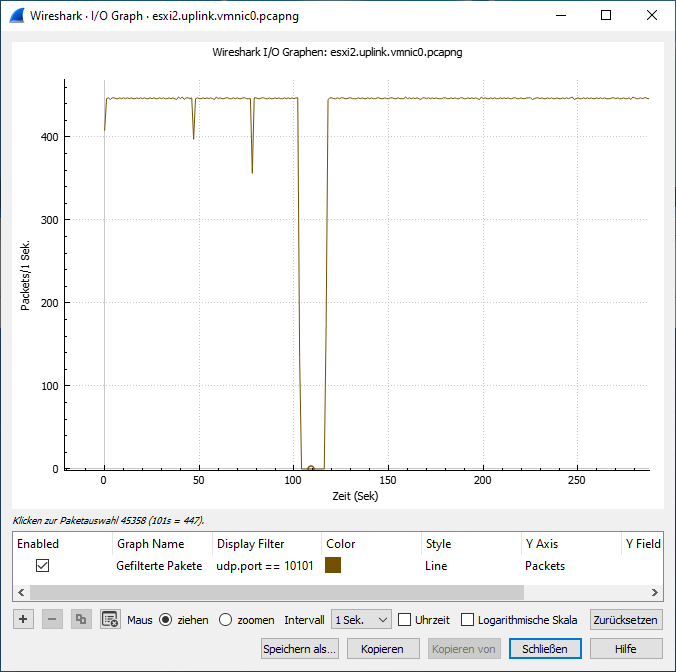
- Wireshark will show time gaps and broken sequence continuity.
- No packet retransmission will occur (since it’s UDP).
Step one: Start iPerf3 on Windows VMs
Start iPerf3 server and client on Windows VMs to generate UDP traffic:
iperf3 -s -B 192.168.110.103 -p 10101 --> Server
iperf3 -c 192.168.110.103 -u -b 5M -l 1400 -t 300 -p 10101 --> Client
Step Two: Start pktcap-uw packet capture
Connect to sending and receiving hosts via SSH, find a location on the datastore to save the pcap files and then start the trace on both switchport and vmnic.
For detailed usage of pktcap-uw, refer back to Part 2 where the command syntax and capture options are explained in full.
Step three: Simulate Link Flaps
- While the test is running, simulate short link failures:
- On physical switch: disable and re-enable the port, or temporarily unplug the cable
- On ESXi host: disable the vmnic, port group, or uplink from the vSwitch settings
Step Four: Analyze iPerf3 and Packet Captures
- iPerf3: Large packet loss percentages during the flap moments
- Wireshark: Delta Time Displayed shows large gaps between packets
- pktcap-uw: Transmission continues on sender, but receiver misses bursts of traffic
Key Findings
This scenario demonstrated that intermittent link disruptions — even if brief — result in immediate and unrecoverable UDP packet loss. Unlike TCP, UDP lacks built-in retransmission or state awareness, so each lost packet is gone permanently. Both iPerf3 and Wireshark confirmed that packets were sent from the source VM but never reached the receiver during the flap events. Such disruptions are especially critical for real-time traffic like VoIP, video conferencing, or telemetry, where even momentary drops can degrade quality.
Conclusion
Connection flapping, though often transient, can have a severe impact on UDP-based applications. This test reinforces the importance of stable infrastructure and proper link monitoring. While CPU load and bandwidth constraints can degrade performance gradually, flapping connections introduce sudden, sharp packet loss that is harder to diagnose — but easy to detect with packet-level tools like pktcap-uw and Wireshark.
What’s Next
With the effects of transient disconnections covered, it’s time to shift our attention to the network’s architecture — specifically inter-VLAN routing and bandwidth shaping. In the next part, we move the receiving VM to a different VLAN and introduce a bandwidth limitation using pfSense to explore how congestion in the routing path affects UDP traffic.