
Have you ever upgraded the ESXi software on HPE Servers and after reboot iLO did not come up anymore? Well, this is what happened to me after installation of ESXi software patches on a couple of HPE servers. Even the ESXi patches were installed successfully and the ESXi hypervisor started correctly, the iLO interface couldn’t be reached anymore. All the installation was done remotely, so there was no physical access to the servers.
Luckily, on our servers there was installed a HPE customized ESXi image which has available the HPE ESXi utilities. We used one of these utilities ( HPONCFG ) to reboot the iLO and after that the iLO started to respond again. To see how can you achieve this and also to get more information about these tools, jump to HPONCFG Utility options. If you also need to install these utilities, please read further.
HPE ESXi utilities download
If HPE Utilities are not installed, you can download the utilities bundle file from here : ESXi 6.5 and ESXi 6.7 and install it yourself.
The HPE ESXi Utilities Offline bundle for VMware vSphere 6.x includes a few utilities for configuration of servers.
HPONCFG can be used to set up and reconfigure the iLO (Integrated Lights-Out) management controller of a server.
BOOTCFG can be used to set up the boot configuration for the server.
SSACLI can be used in the configuration of HPE Smart Array controllers and attached storage.
The TESTEVENT utility generates test WBEM indication and test SNMP trap.
The CONREP Utility enables server hardware configuration capture, set and duplication.
HPE ESXi utilities installation
To install the bundle from ESXi host, transfer the zip file onto the ESXi host local path, then execute the below command:
#esxcli software vib install -d <ESXi local path><bundle.zip>
After the bundle is installed, reboot the ESXi host for the updates to take effect.
Note: The offline bundle can also be installed from VMware vCenter Update Manager as a patch.
HPONCFG Utility options
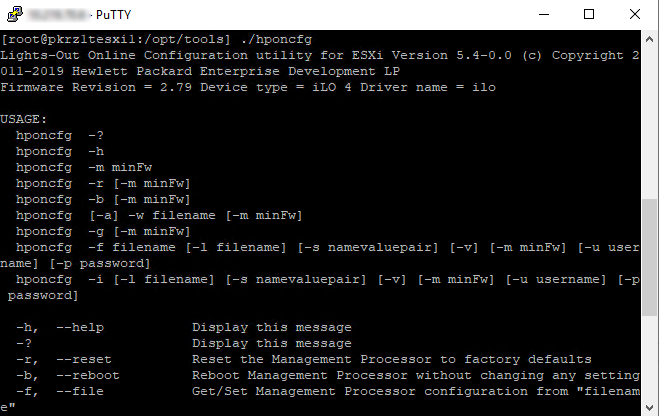
In this post I will focus only on HPONCFG utilty. To access the utility, ssh to ESXi host and browse to /opt/tools. Then execute the command bellow to see the options:
#cd /opt/tools
#./hponcfg
Reboot iLO from ESXi
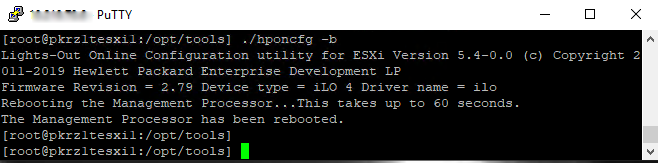
To reboot the iLO browse to /opt/tools and execute the command below:
#./hponcfg -b
Reset iLO to factory defaults
Browse to/opt/tools and execute the command below to reset the iLO configuration to factory defaults. Attention: iLO License will be also removed.
#./hponcfg -r
Export the iLO configuration into a file
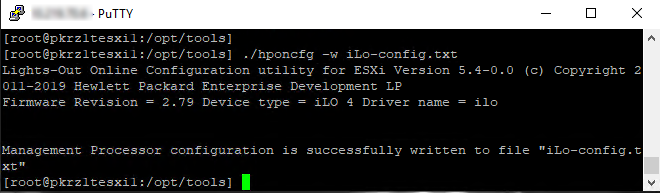
Browse to /opt/hp/tools and execute the command below to export the iLO configuration into a text file.
#./hponcfg -w iLO-config.txt
Import the iLO configuration from a file
Browse to /opt/hp/tools and execute the command below to import the iLO configuration from text file.
#./hponcfg -f iLO-config.txt
Export Network Configuration including Shared Network Port and VLAN ID settings of iLO
I have noticed that if you are using the normal export of the iLO configuration into a file, you will not get the settings of Shared Network and VLAN ID. Use the following procedure to get this configuration as well.
Create a file get_network.xml that contains the text below. Replace iLO_user and iLO_password with your iLO credentials.
<!-- Sample file for Get Global command -->
<RIBCL VERSION="2.0">
<LOGIN USER_LOGIN="iLO_user" PASSWORD="iLO_password">
<RIB_INFO MODE="read">
<GET_NETWORK_SETTINGS />
</RIB_INFO></LOGIN>
</RIBCL>
Then execute the command below to get the iLO configuration
root@server ~]# ./hponcfg -f get_network.xml
Here is the content of the file:
Firmware Revision = 1.94 Device type = iLO Driver name = hpilo
<GET_NETWORK_SETTINGS>
    <ENABLE_NIC VALUE="Y"/>
    <SHARED_NETWORK_PORT VALUE="Y"/>
    <SHARED_NETWORK_PORT_VLAN VALUE="Y"/>
    <SHARED_NETWORK_PORT_VLAN_ID VALUE="1010"/>
    <SPEED_AUTOSELECT VALUE="Y"/>
    <NIC_SPEED VALUE="10"/>
    <FULL_DUPLEX VALUE="N"/>
    <DHCP_ENABLE VALUE="N"/>
    <DHCP_GATEWAY VALUE="Y"/>
    <DHCP_DNS_SERVER VALUE="Y"/>
    <DHCP_WINS_SERVER VALUE="Y"/>
    <DHCP_STATIC_ROUTE VALUE="Y"/>
    <DHCP_DOMAIN_NAME VALUE="Y"/>
    <REG_WINS_SERVER VALUE="Y"/>
    <REG_DDNS_SERVER VALUE="Y"/>
    <PING_GATEWAY VALUE="N"/>
    <MAC_ADDRESS VALUE="00:16:35:37:09:f2"/>
    <IP_ADDRESS VALUE="192.168.1.101"/>
    <SUBNET_MASK VALUE="255.255.255.0"/>
    <GATEWAY_IP_ADDRESS VALUE="192.168.1.1"/>
    <DNS_NAME VALUE="SERVERNAME-ILO"/>
    <DOMAIN_NAME VALUE=""/>
    <PRIM_DNS_SERVER VALUE="0.0.0.0"/>
    <SEC_DNS_SERVER VALUE="0.0.0.0"/>
    <TER_DNS_SERVER VALUE="0.0.0.0"/>
    <PRIM_WINS_SERVER VALUE="0.0.0.0"/>
    <SEC_WINS_SERVER VALUE="0.0.0.0"/>
    <STATIC_ROUTE_1 DEST="0.0.0.0"
                    GATEWAY="0.0.0.0"/>
    <STATIC_ROUTE_2 DEST="0.0.0.0"
                    GATEWAY="0.0.0.0"/>
    <STATIC_ROUTE_3 DEST="0.0.0.0"
                    GATEWAY="0.0.0.0"/>
</GET_NETWORK_SETTINGS>
Configure iLO network using import file
To set the iLO network, create a file set_network.xml that includes the text below and then import it.
<RIBCL VERSION="2.1">
<LOGIN USER_LOGIN="Administrator" PASSWORD="password">
<RIB_INFO MODE="write"><MOD_NETWORK_SETTINGS>
    <ENABLE_NIC VALUE="Y"/>
    <SHARED_NETWORK_PORT VALUE="Y"/>
    <SHARED_NETWORK_PORT_VLAN VALUE="Y"/>
    <SHARED_NETWORK_PORT_VLAN_ID VALUE="1010"/>
    <DHCP_ENABLE VALUE="N"/>
    <IP_ADDRESS VALUE="192.168.100.55"/>
    <SUBNET_MASK VALUE="255.255.255.0"/>
    <GATEWAY_IP_ADDRESS VALUE="192.168.100.1"/>
</MOD_NETWORK_SETTINGS>
</RIB_INFO>
</LOGIN>
</RIBCL>
[root@server ~]# ./hponcfg -f set_network.xml
Reset admin password
Create a new file reset_admin.xml with the following content and add your password in PASSWORD VALUE section.
<RIBCL VERSION="2.1">
 <LOGIN USER_LOGIN="Administrator" PASSWORD="password">
  <USER_INFO MODE="write">
  <MOD_USER USER_LOGIN=”Administrator”>
  <password value=”newpassword”/>
  </MOD_USER>
  </USER_INFO>
 </LOGIN>
</RIBCL>
Load the above configuration to set a new administrator password, using the command below.
[root@server ~]# ./hponcfg -f reset_admin.xml
After that you shoud be able to access the iLO using the new password.
Add new user
Create a new file file using command:
#vi add_user.txtThen add the following text in the file:
<RIBCL VERSION="2.1">
 <LOGIN USER_LOGIN="Administrator" PASSWORD="password">
 <USER_INFO MODE="write">
 <ADD_USER
 USER_NAME = "admin"
 USER_LOGIN = "admin"
 PASSWORD = "test123">
 <ADMIN_PRIV value = "Y"/>
 <REMOTE_CONS_PRIV value = "Y"/>
 <RESET_SERVER_PRIV value = "Y"/>
 <VIRTUAL_MEDIA_PRIV value = "Y"/>
 <CONFIG_ILO_PRIV value = "Y"/>
 </ADD_USER>
 </USER_INFO>
 </LOGIN>
</RIBCL>
Save the file and then import it back to iLO configuration with bellow command.
#./hponcfg -f add_user.txtNow you should be able to log in with your new configured user.
Update for ESXi v8
Starting with ESXi version 8, the above tools will not be available anymore. Instead, another tool will be provided by HPE and could be found at this location.
#cd /opt/ilorest/binStart the tool ilorest by using the command:
#./ilorest.shYou will get this prompt once the tool started:

By entering help, you will get a list with all the commands available. I will use for now only iloreset to reboot the iLO-Board and then exit.
iLORest > iloreset
Feel free to experiment with the rest of the commands.
More information about using the RESTful interface tool you can find here.
I hope all this information will be helpful for you. Thanks for beeing here and see you at the next post.
You saved my life. Thank you sooooo much. This article is gold!
Does it also work in superdome flex?
thank you mate !