
There are cases when a remote computer could be hard to reach. This computer could be placed behind a firewall or a router (NAT) whose rules or settings cannot be changed.
An easy and practical solution that could help us in this case is to set up a reverse SSH tunnel on Linux. Reverse SSH tunneling allows you to create a connection from the remote computer to a local computer and using this established connection to set up a new connection from your computer back to the remote computer. How can you achieve this, I’ll explain you in the following lines.
Step One – Solution Design
My concrete case where I need this kind of implementation is a Raspberry Pi connected to Internet using a 3G USB dongle. The Raspberry Pi is used in a remote house to convert a classic alarm system to a smart alarm (with Internet and SMS functionality).
I’ll write more about this project in a different post, for now let’s focus on ssh tunnel subject, which is quite a challenging part.
Here is the design of the solution:
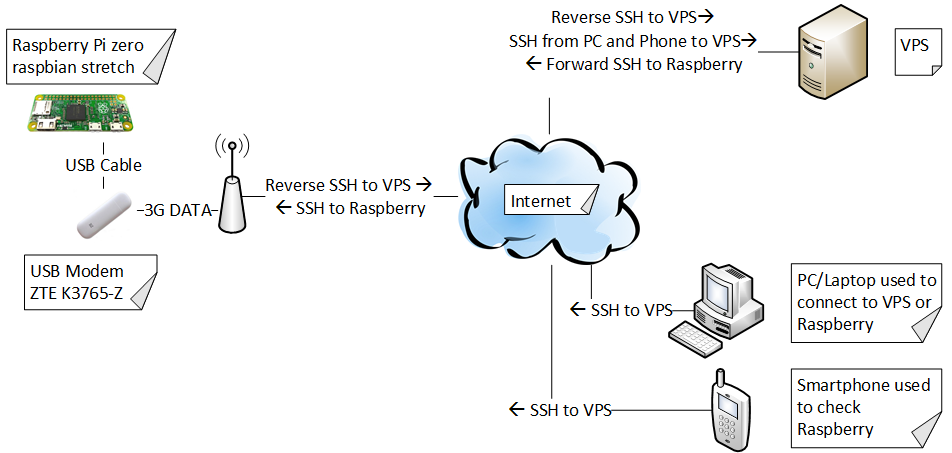
I would like to be able to access the Raspberry Pi from anywhere, not only from my local computer. For this solution we’d need a Linux computer that will be anytime available and directly accessible from Internet. Or even better, we can choose a VPS (virtual private server) solution from one of the many providers.
I am living in Germany and I chose a VPS solution from www.ionos.de. At the time I’m writing this article, the solution is very affordable, only 1Euro/month and you get 1Core CPU, 0,5GB and 20GB SSD. It is also very easy to set up and it has a very nice and intuitive interface.
Step two – Setting up a reverse SSH tunnel
Note: We are working with root user, if you are not logged in as root, add sudo in the front of the commands.
We’ll start by setting up the reverse SSH tunnel on the Raspberry Pi by typing in the following command:
# ssh -R 3333:localhost:22 user@xxx.xxx.xxx.xxx
Note:
- 3333 – the port used for the reverse SSH tunnel (port should be opened on VPS).
- 22 – default ssh port of Raspberry
- user@xxx.xxx.xxx.xxx – user and IP address of the VPS, replace with your actual user and IP
I’ve opened port 3333 in the Firewall on the management web-interface of the VPS.
My iptables on VPS has the default configuration, so is not dropping any packets. In this case we don’t have to do any settings in iptables.
# iptables -L -vn
Chain INPUT (policy ACCEPT 39 packets, 4642 bytes)
  pkts bytes target     prot opt in     out     source               destination
 Chain FORWARD (policy ACCEPT 0 packets, 0 bytes)
  pkts bytes target     prot opt in     out     source               destination
 Chain OUTPUT (policy ACCEPT 33 packets, 5915 bytes)
  pkts bytes target     prot opt in     out     source               destination
Step three – Connecting to the SSH tunnel from VPS
After we’ve created the tunnel with the command at step 1, Raspberry can be accessed by executing the following command on the VPS:
# ssh localhost -p 3333
In order to access Raspberry from another machine, we have to first ssh to the VPS
# ssh user@xxx.xxx.xxx.xxx
And then logging in Raspberry from the VPS:
# ssh localhost -p 3333
Step four – Connecting to the SSH tunnel from another machine
To open the SSH Tunnel directly to Raspberry from another machine, without connecting first to the VPS (actually the connection will also pass through VPS, but we’ll not see anymore the VPS login), we have to add/modify one variable in /etc/ssh/sshd-config on the VPS.
# nano /etc/ssh/sshd-config
Look for GatewayPorts. If you found it and it looks like this #GatewayPorts no, delete “#” (to uncomment it) and change it to GatewayPorts yes . If the variable doesn’t exist in the file, simply add GatewayPorts yes at the end of the file
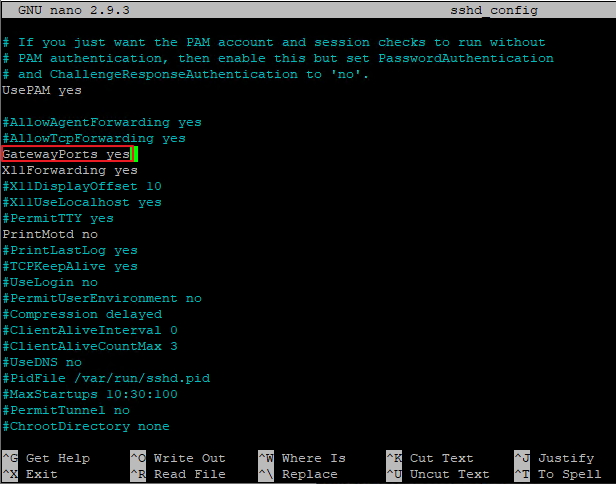
After you changed the file, we have to reload the sshd service.
# systemctl reload sshd.service
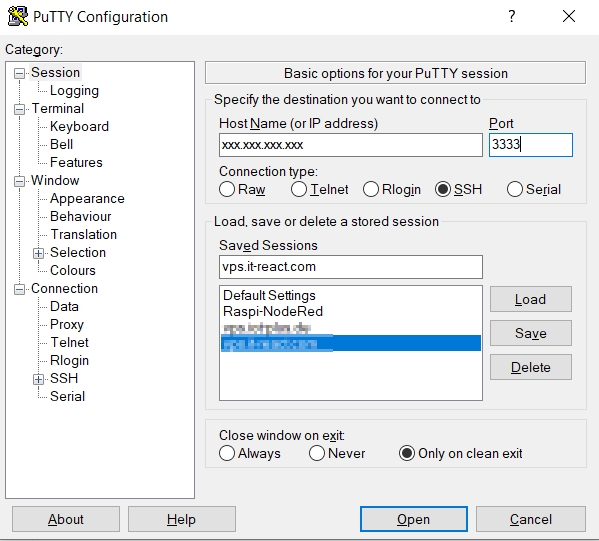
Now we can start a connection directly to Raspberry from a Windows machine by using this command in CLI, or using Putty:
> ssh -p 3333 pi@xxx.xxx.xxx.xxx
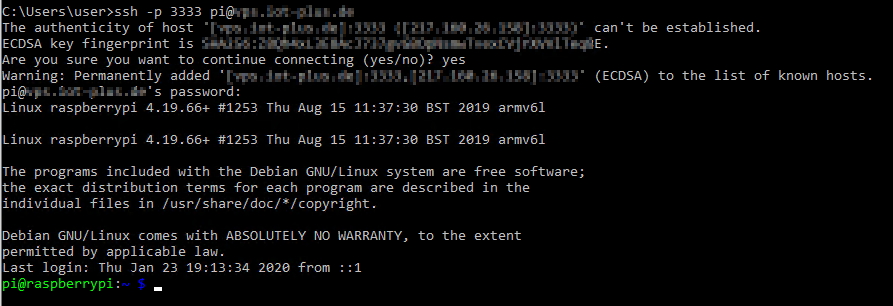
…and we’re in, now we can insert commands in Raspberry
Step five – Creating a persistent SSH tunnel
The tunnel we created so far won’t be persistent and will be dropped if the connection of Raspberry drops, if we want to make our reverse SSH tunnel persistent we need to install autossh.
Here is the command to install autossh on Raspberry:
# apt-get install autossh
We will use a script that will start automatically at boot and create the ssh tunnel. I’ve found a script that can do our job pretty good and adapted to my needs. You can find it here . Thanks to the author.
To make the Reverse SSH Tunnel start at boot without our intervention, we need to set up ssh-key based authentication. This means that the connection will be created without being necessary to introduce the password.
How to achieve a ssh-key based authentication you can find here.
Here is the original script:
#! /bin/sh
# author: Clément Désiles
# date: 01/08/2016
# source: https://gist.github.com/suma/8134207
# source: http://stackoverflow.com/questions/34094792/autossh-pid-is-not-equal-to-the-one-in-pidfile-when-using-start-stop-daemon

### BEGIN INIT INFO
# Provides:          autossh
# Required-Start:    $remote_fs $syslog
# Required-Stop:     $remote_fs $syslog
# Default-Start:     2 3 4 5
# Default-Stop:      0 1 6
# Short-Description: autossh initscript
# Description:       establish a tunnelled connexion for remote access
### END INIT INFO

. /etc/environment
. /lib/init/vars.sh
. /lib/lsb/init-functions

TUNNEL_HOST=iam.perdu.com
TUNNEL_USER=toto
TUNNEL_PORT=42000
MONITOR_PORT=42001
KEY_PATH=/home/toto/.ssh/id_rsa

NAME=autossh
DAEMON=/usr/lib/autossh/autossh
AUTOSSH_ARGS="-M $MONITOR_PORT -f"
SSH_ARGS="-nNTv -o ServerAliveInterval=60 -o ServerAliveCountMax=3 -o IdentitiesOnly=yes -o StrictHostKeyChecking=no \
         -i $KEY_PATH -R $TUNNEL_PORT:localhost:22 $TUNNEL_USER@$TUNNEL_HOST"

DESC="autossh for reverse ssh"
SCRIPTNAME=/etc/init.d/$NAME
DAEMON_ARGS=" $AUTOSSH_ARGS $SSH_ARGS"

# Export PID for autossh
AUTOSSH_PIDFILE=/var/run/$NAME.pid
export AUTOSSH_PIDFILE

do_start() {
	start-stop-daemon --start --background --name $NAME --exec $DAEMON --test > /dev/null || return 1
	start-stop-daemon --start --background --name $NAME --exec $DAEMON -- $DAEMON_ARGS    || return 2
}

do_stop() {
	start-stop-daemon --stop --name $NAME --retry=TERM/5/KILL/9 --pidfile $AUTOSSH_PIDFILE --remove-pidfile
	RETVAL="$?"
	[ "$RETVAL" = 2 ] && return 2
	start-stop-daemon --stop --oknodo --retry=0/5/KILL/9 --exec $DAEMON
	[ "$?" = 2 ] && return 2
	return "$RETVAL"
}

case "$1" in
  start)
	log_daemon_msg "Starting $DESC" "$NAME"
	do_start
	case "$?" in
		0|1) log_end_msg 0 ;;
		2) log_end_msg 1 ;;
	esac
	;;
  stop)
	log_daemon_msg "Stopping $DESC" "$NAME"
	do_stop
	case "$?" in
		0|1) log_end_msg 0 ;;
		2) log_end_msg 1 ;;
	esac
	;;
  status)
	status_of_proc "$DAEMON" "$NAME" && exit 0 || exit $?
	;;
  *)
	echo "Usage: $SCRIPTNAME {start|stop|status|restart}" >&2
	exit 3
	;;
esac
Here are the install instructions:
#mv ~/Downloads/autossh.init.sh /etc/init.d/autossh#chmod +x /etc/init.d/autossh#update-rc.d -f autossh defaults 90 90 > /dev/null 2>&1
This is the part I’ve modified:
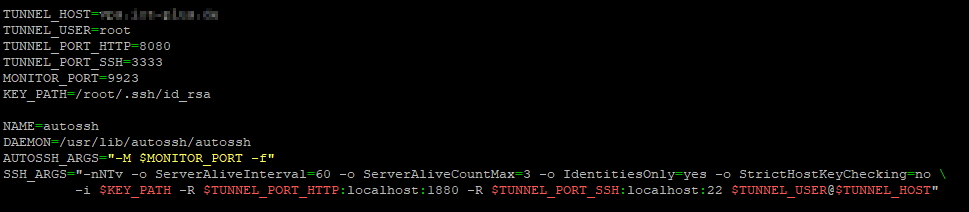
The monitor port, which is 9923 in our case should also be opened in VPS.
Autossh will send test data on the monitoring port and receive it back on the port above. In our case, autossh will set up forwards so that it can send data on port 9923 and receive it back on 9924.
The autossh script should start at boot and re-connect in case the connection is dropping.
Update1: Please note in the previous screenshot that I’m opening actually two ports for reverse tunneling, one is for ssh (port 22 ) and the other one is for node-red (port 1880). So if I open a browser and access the IP address of the VPS on port 8080, then the connection will be forwarded to the Raspberry Pi port 1880, and in this way I can access the node-red running on Pi.
If there is any Firewall running on the VPS or the provider of your VPS instance has a suplementary Firewall, you have to open that port (in our case port 8080).
More than that, if you have more Raspberry Pi boards in the same scenario, you can create a reverse tunelling on every Pi pointing to the same VPS, but using different ports on VPS. So if for the first Pi we used port 8080 of the VPS, for the second one we can use port 8081. When we acess http://VPS-IP:8080/ui we’ll land to the node-red dashboard of the first Pi, when access http://VPS-IP:8081/ui we’ll land to the node-red dashboard of the second Pi.
Update2: autossh will create the automatic connection with the help of ssh-keys. Please check here how to generate the ssh-keys. Please see in script the path of the ssh-key: KEY_PATH=/root/.ssh/id_rsa
Step six – Troubleshooting Reverse SSH Tunnel
You can check if the Reverse SSH Tunnel is started by issuing this command on VPS:
# netstat -lt
Active Internet connections (only servers)

Proto Recv-Q Send-Q Local Address           Foreign Address         State

tcp        0      0 localhost:domain        0.0.0.0:*               LISTEN

tcp        0      0 0.0.0.0:ssh             0.0.0.0:*               LISTEN

tcp        0      0 0.0.0.0:9923            0.0.0.0:*               LISTEN

tcp        0      0 0.0.0.0:3333            0.0.0.0:*               LISTEN
If you see here port 3333 and 9923 this means that Reverse SSH Tunnel is up and running.
If the ports above are not listening on VPS , you have to further investigate the problem on Raspberry side and check if the autossh service is running with the command:
# systemctl status autossh.service
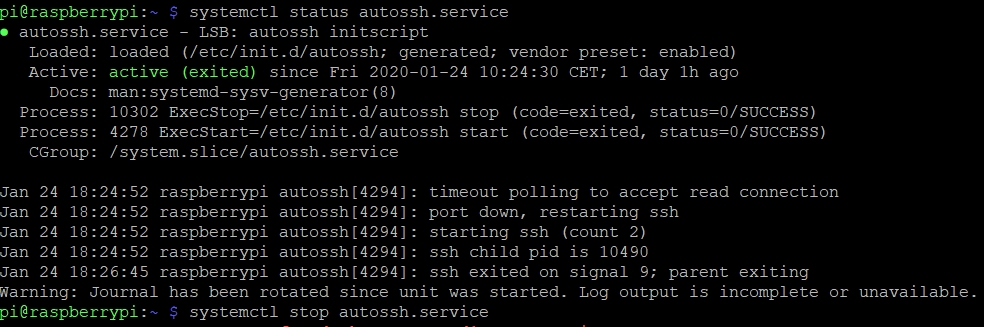
As you can see the service is active, but exited. This means that tunnel is not running. In this situation it helps to restart the service with the following command:
# systemctl restart autossh.service
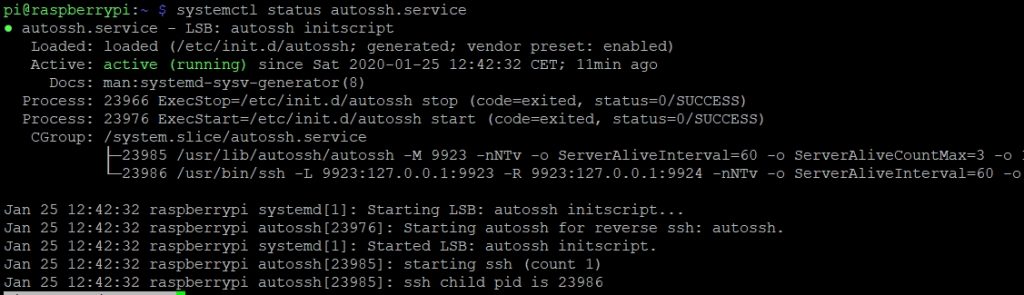
We have suceeded, now the service is running and our tunnel is up.
It’s looks like a very good tutorial. THANKS! I will try!
A helpful tutorial that walks through all the important steps. I used your steps as an outline to set up a similar tunnel for routing http, vpn, ssh traffic through a reverse tunnel so I can access the local network hiding behind ISP NAT. The script works well for keeping things alive with autossh. Of note, you didn’t mention that you need the set up SSH keys using ssh-keygen on the VPS and then transferring the key to the computer behind the NAT, so autossh can connct without passwords.
I’m glad that helped you, Andrew! Thanks for your remark. Indeed I had to set up ssh-keys. I’ve updated my post.
For multiple raspberry pi’s, do they all do monitoring on port 9923? Do we set a different monitoring port for each pi? Where is it set that the message return port is 9924?
Hey RC. You have to use a different monitoring port for each pi. The message return is not set, it will be the next above port. So if the set monitor port is MONITOR_PORT=42001, then the return will be 42002. Hope it helps.
Hi RC This was a great manual how to set this up. I got it working in no time. I did run in to one problem that I hope you could help with. I am trying connecting to a raspberry pi with a reverse tunnel from another pi through a router through a dns service. So basically dns -> router port 4010 -> port 22 raspberry pi port 4020 -> port 22 raspberry pi. When I connect directly from first raspberry pi it works great. When I try to connect though the router it does not work. It gives me a connection refused reply. The problem offcourse is I dont know where the connection is refused. Hope you could help me or tell me how to debug.
Sorry, gave credit to the wrong person. Ioan Penu great guide and easy to follow and put into practice.