
In today’s post, I would like to show you the process of transforming a single NIC old laptop into an OPNsense firewall/router. I wanted for some time to install pfSense in my home network, but I didn’t want to buy an expensive already made firewall device.
After spending a few days looking for a solution, I found at some point that Dell PowerEdge R210 II is quite used as hardware for pfSense/OPNsense. I had the intention to buy one from Ebay, though they are also not so cheap. Then I changed my mind when thinking that the noise coming from the fans could be disturbing and the power consumption could also be a bit to high. Then I searched for a few more days and finally I decided that will be more challenging to go as cheap as possible with this project. Though I haven’t had any idea about the hardware that I was going to use.
Suddenly, I remembered that I am having an old laptop that was lying in a corner and I said that this would be the perfect candidate for my new future firewall/router. I wanted to integrate the firewall in my home lab rack, so I’ve started to tear all the components apart until only the base components remained – motherboard, ram, cpu, hdd. Here is a picture:
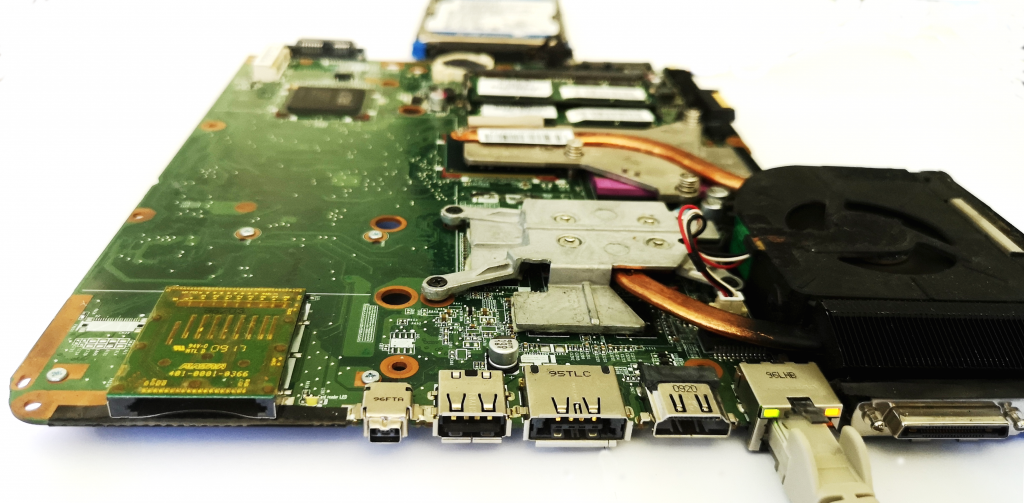
I am planing to integrate these components in a rack metal case, but a rack miniITX case is expensive and I don’t know if will properly fit. Cause I decided to maintain the price as low as possible, I looked for other possibilities and found on Ebay and achieved a switch that was sell with only 10€ transport included. I’ll try to use its metal case and to integrate my components in it. I hope it will work.
For the moment, my firewall is completely naked and all the components are lying on my desk. I didn’t have the patience to wait until the switch is coming to take its metal case, so I proceeded with the software installation. I’ve started with pfSense installation, but because of some problems with the firewire port on my laptop’s motherboard, which couldn’t be disabled, the installation of the pfSense failed.
After many unsuccessful attempts to access the Advanced Bios of the motherboard and to disable the Firewire port, I gave up on pfSense and decided to give it a try to OPNsense. Both of them are having the same origins, but it seems pfSense is more popular. Though there are many people that prefer OPNsense to pfSense and I also find its interface more clean and intuitive. The installation of OPNsense went very smooth, without any errors.
Requirements
In regard to OPNsense requirements, you can find here more information.
My hardware’s laptop is:
Processor: Intel(R) Core(TM)2 Duo CPU P7550 @ 2.26GHz (2 cores)
Memory: 4GB
HDD: 500GB
Cause we are having a single NIC device, we also need a managed switch that supports 802.1Q VLAN. Luckily, I already have a 24 ports managed switch, so I’ll use 2 ports for setting up the firewall.
Here is the model I’m using – TP-Link T2600G-28TS, but you can also find cheaper models with fewer ports.
New Network Diagram
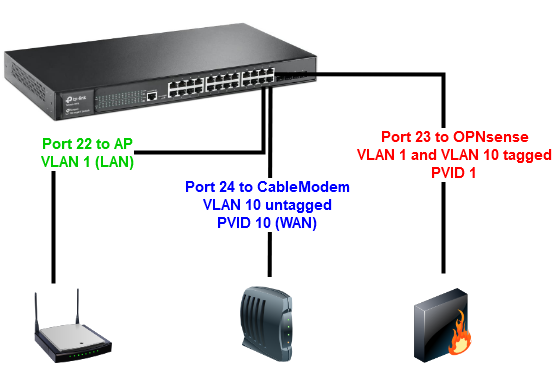
The design of the new network with the OPNsense Firewall and the managed switch will look like in the below diagram:
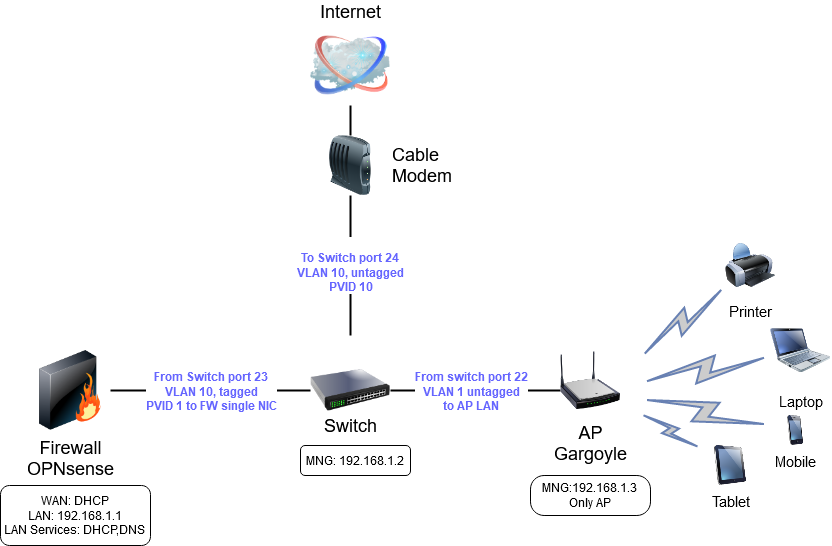
- The cable modem is connected in the port 24 of the managed switch. This link provides Internet to the entire network. The port is configured as VLAN10 untagged (PVID10).
- OPNsense is connected in the port 23 of the switch. All the traffic passes through the firewall where is controlled and analyzed. The port is configured as VLAN10 tagged for WAN traffic and VLAN1 untagged (PVID1) for LAN traffic. OPNsense is running DHCP service on LAN side and is providing IP addresses to all the clients connected on the physical ports of the switch, and to the wireless devices connected through AP .
- In the port 22 of the switch is connected a Wireless AP – Archer C7 that runs Gargoyle. The port of the managed switch has the default configuration.
Step one – Switch Configuration
Let’s see what settings we have to apply on the switch side. The default IP address of the switch is 192.168.0.1, but I’ve already configured it with 192.168.1.2. So I will access the web interface of the switch at http://192.168.1.2 and I will enter the user and password (default: user:admin/pass:admin).
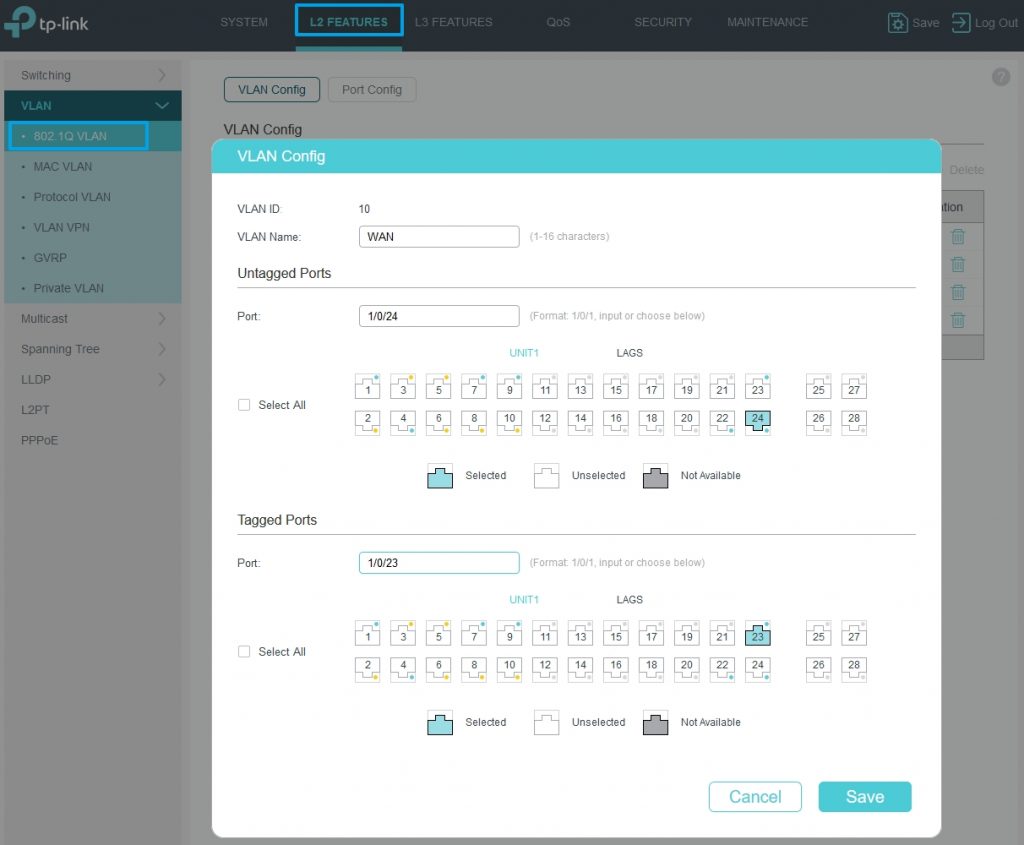
After successfully connected, we go to L2 Features and then VLAN->802.1Q VLAN. Here we add VLAN ID 10, we name it WAN and will assign it to port 24 untagged and to port 23 tagged.
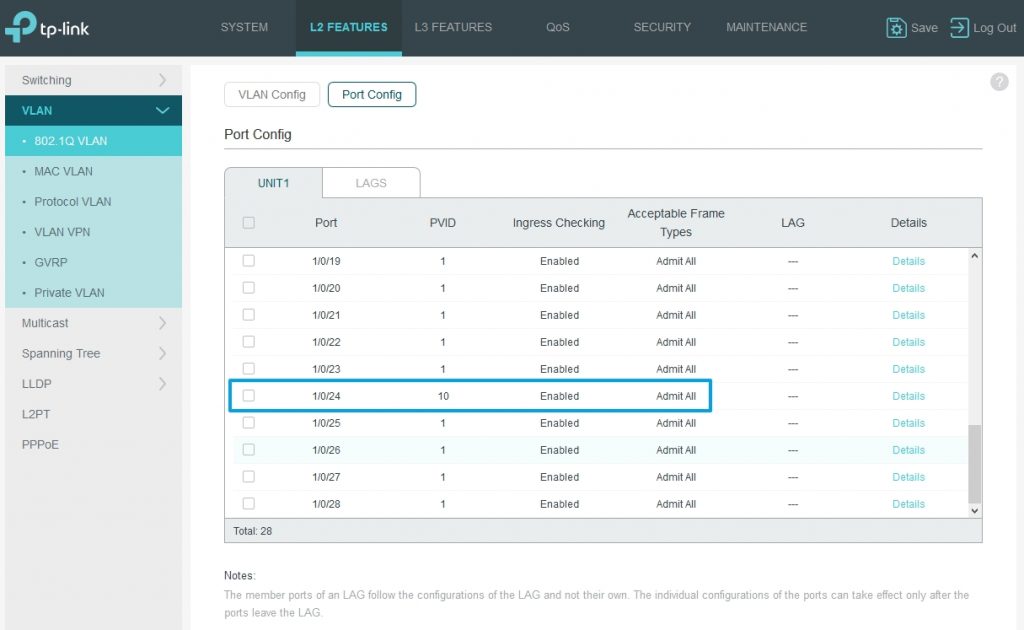
Then we access Port Config tab and we set PVID 10 for port 24.
Step two – OPNsense configuration
After the switch configuration, it’s time now to configure the OPNsense server. We’ll connect the OPNSense machine to port 23 of the switch and the cable modem to port 24 of the switch. Check the bellow diagram:
If you haven’t installed yet the OPNsense software, here is a link where you can get some info.
After the OPNsense software is installed, you will get a menu like the one below. We’ll do from here the initial configuration.
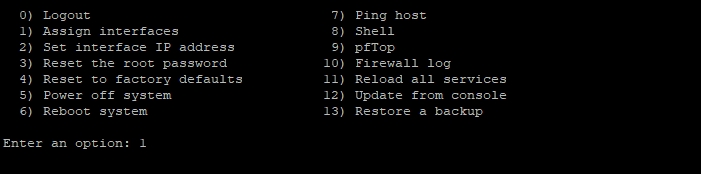
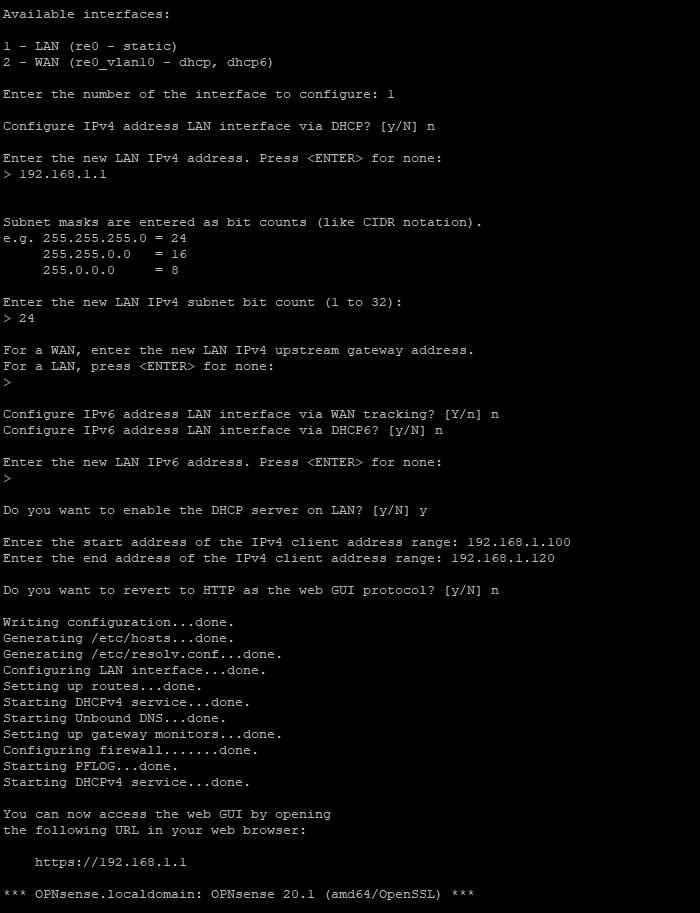
Select option 1) to assign interfaces. Answer yes to “Do you want to set up VLANs now”, then follow the below image:
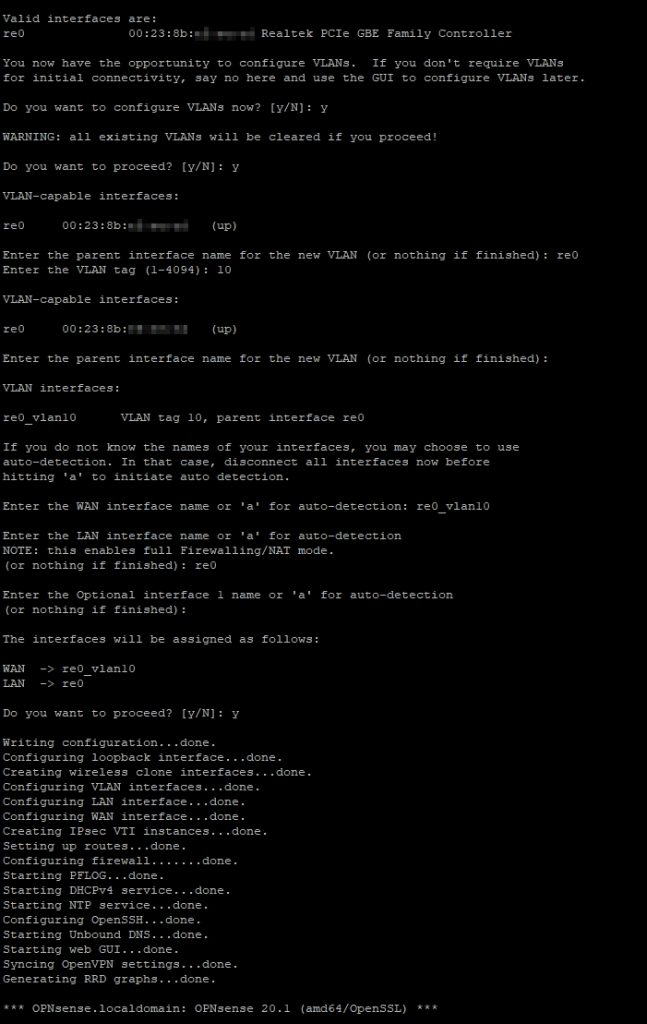
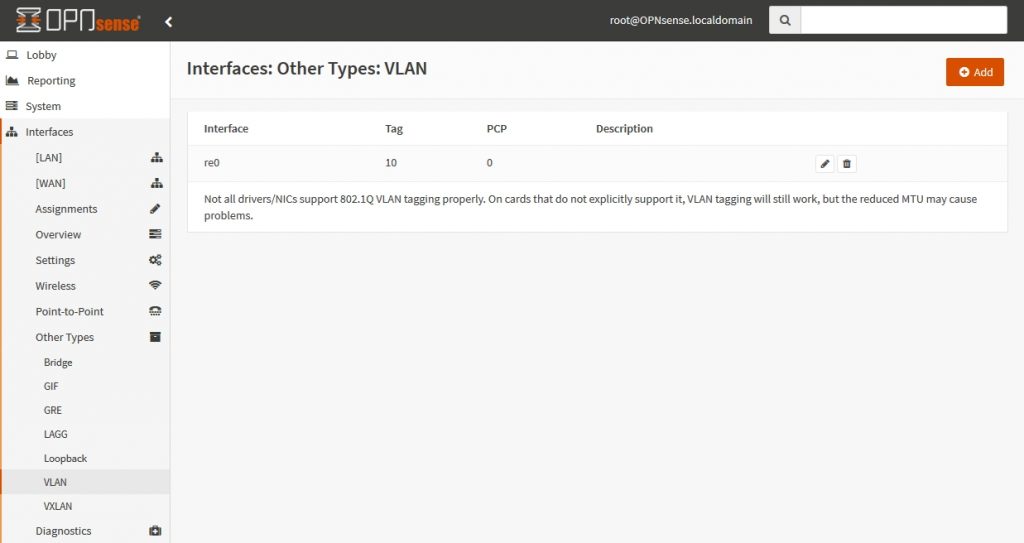
As you can see, we’ve created VLAN 10 for WAN.
The assigned interfaces are:
– re0 for LAN
– re0_vlan10 for WAN
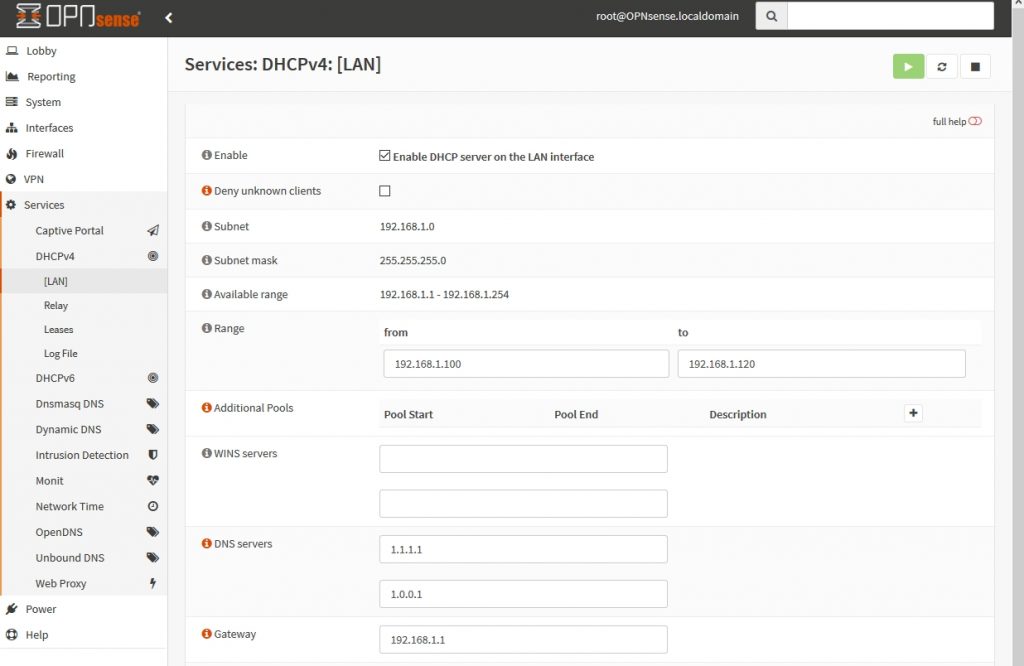
After that, we will access option 2) in the menu and set IP address 192.168.1.1 to LAN interface and enable DHCP with range 192.168.1.100-192.168.1.120.
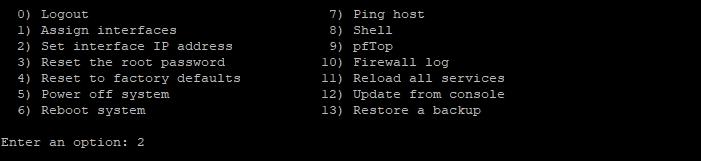
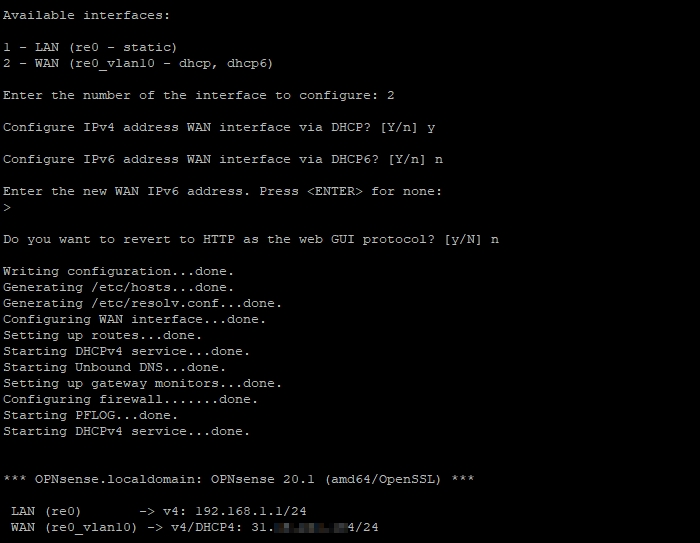
Now we access option 2) again and configure the WAN interface with DHCP.
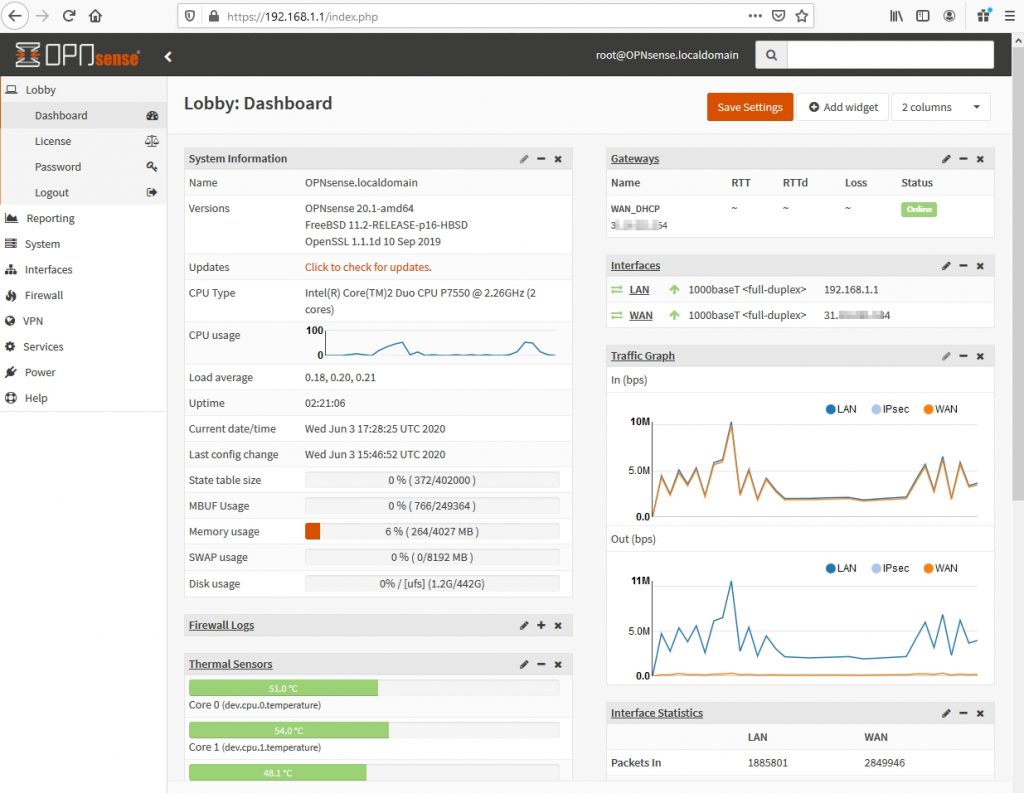
We can access now the web interface at the https://192.168.1.1. Here is how it looks after we login:
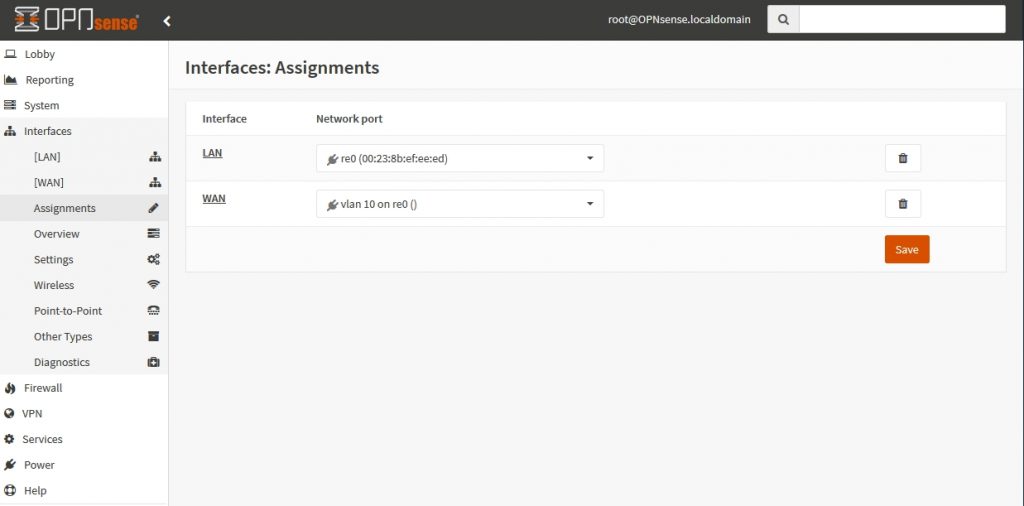
We can check here the LAN and WAN interfaces that we assigned in the CLI: Interfaces>Assignments
In the Interfaces>Other Types>VLAN we can check the VLAN assigned for WAN Interface:
The last thing we check is the DHCP Service. We’ve already set the range 192.168.1.100-192.168.1.120 in the CLI. In the web interface we’ll add the DNS Servers and Gateway.
That was the initial configuration of the OPNsense.
Step three – Wireless Router Configuration
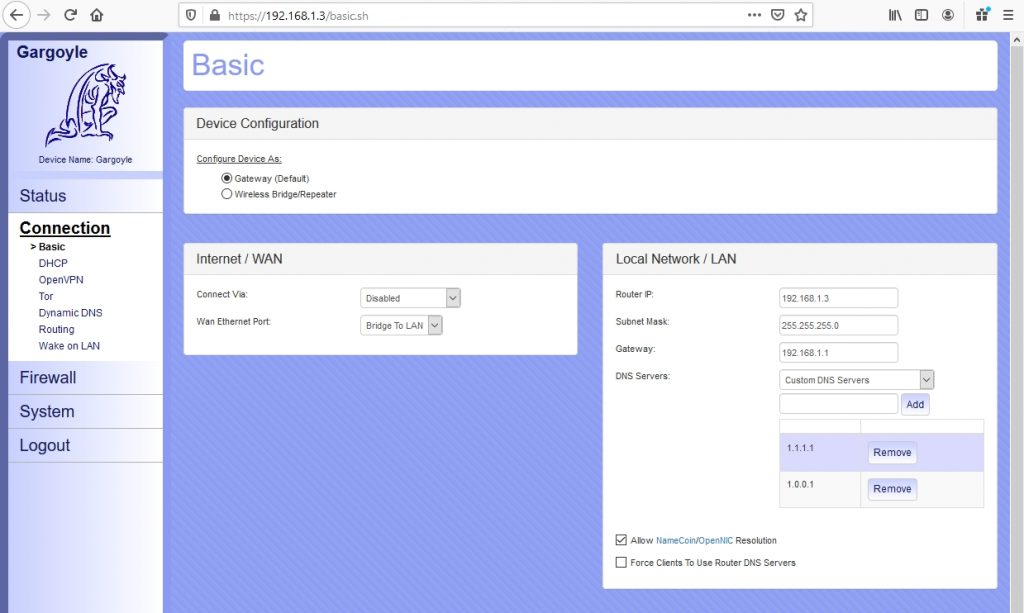
My wireless router is a TP-Link Archer7 running Gargoyle software. I’ve accessed its web interface and assigned the IP address 192.168.1.3.
In the Connection>Basic, I’ve disabled the WAN interface and I set Wan Ethernet Port to Bridge to Lan. Now the WAN interface is acting as a LAN port together with the other 4 LAN ports.
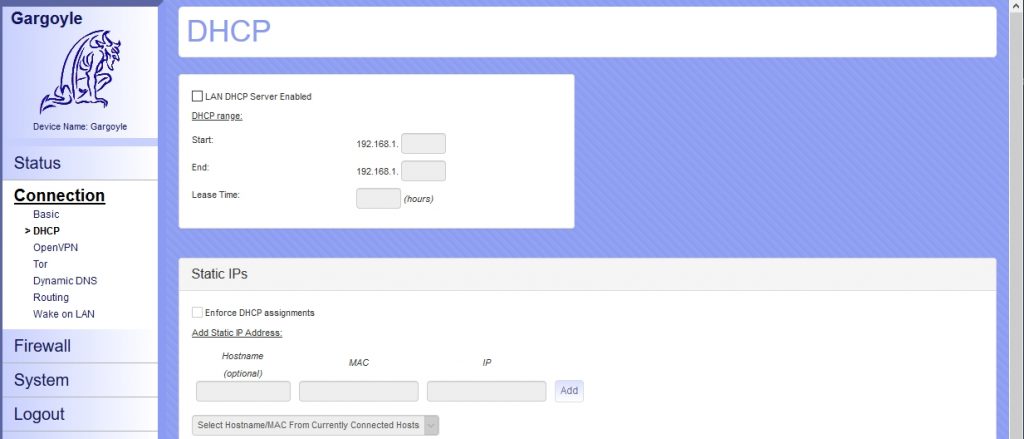
Previously, the DHCP service was running on my wi-fi router. Now, I will disable it because DHCP service is configured on OPNsense.
Every device that will connect to the wi-fi AP, will receive an IP address from OPNsense and will be able to connect to Internet.
Conclusion
We saw together in this post how we can turn an old laptop that was lying in a corner gathering dust into a state-of-the-art security device. For me, it was a great experience to deconstruct and reconvert this piece of hardware and to give it a new sense. I’ve learned some new things and I encourage you to give it a try to this project.
Update
Because my old laptop’s board had a very high power consumption, somewhere around 60-80W, I’ve replaced it with a MINISFORUM fan-less mini pc and I’ve installed pfSense.
The installation went smooth and base configuration for pfSense is pretty much the same as for OPNSense. The only problem was an annoying error – sdhci_pci0_slot0:Controller Timeout which was delaying the start of the system with around 5 minutes.
I’ve solved it by adding the following line in /boot/device.hints file: hint.sdhci_pci.0.disabled=”1″
Because vi editor on FreeBSD seems to be different than the one I know, I’ve preferred to install nano to edit the device.hints file :
pkg install nano
Why did you switch to pfsense from opnsense? I started down this road and was going to install pfsense, but hardware conflicts stopped me.
“run_interrupt_driven_hooks – waiting for xpt_config” was the error, and no amount of googling got me past. Then I found this article and checked out opnsense. It has worked and got me to the point of installation and I am ready to finish doing the work of this article… but now I am curious.
Why did you go to pfsense, and is there any reason I should. Or is it just as well to stay on opnsense?
One of the reasons for doing the switch was that I wanted from the start to have pfSense because it seems to be more popular and better documented. Once I changed the hardware I wanted to give it a try. The second reason were some issues I had with a Firewall rule that was not working. The problem could have occurred also due to my lack of knowledge at that time.
OPNSense has a more intuitive and clean menu though. So if everything is working for you, there is no reason to change it.
Pingback: pfSense - re0 Watchdog Timeout Error - IT-REACT
Are you sure your network is correct? I would have thought having that switch directly connected to the modem puts it at a potential to be hacked. Better to have the firewall between the two for piece of mind
That’s what the VLANs are for. VLAN 10 connects the modem with the firewall, and then VLAN 1 connects the firewall with the rest of the LAN network. The VLANs prevent direct communication between the modem and the LAN.network.
Thanks for the guide, awesome help since I have a similar switch to you!
Great explanation, thanks.
I had a small issue, It was not clear to me that the port which is connected to the OPNsense FW needs to be untagged on vlan 1 and tagged on vlan 10. I ran into problems by tagging them both for vlan 1 and 10