
In the world of virtualization, managing resources efficiently is super important. If you’re an administrator dealing with virtual environments, using the right tools is a must. That’s where PowerShell comes in—a really helpful tool that can make managing VMware snapshots easier, so things run smoothly and problems get solved fast.
Simplifying Virtual Management with PowerShell
Imagine a world where things happen quickly and accurately. That’s exactly what PowerShell does. With its strong scripting abilities and easy connection to VMware, it’s the tool you need to make managing your virtual environment easier, faster, and stronger.
Why PowerShell Matters
Think about effortlessly creating snapshots to protect important parts of your virtual machine operations. Picture setting up snapshot schedules easily across all your virtual machines, making sure your data is safe and your storage is used well. These are the reasons why PowerShell isn’t just an option—it’s a must for managing virtual systems nowadays.
In this blog post, we’re going to talk about how VMware snapshots and PowerShell work together. We’ll help you with the setup, creating scripts, and automation, showing you how this combo can change the way you manage virtual environments. Get ready for a future where managing things efficiently and confidently is all powered by PowerShell.
Preparing the environment
Let’s install the PowerCLI module in PowerShell first. Open the PowerShell as Administrator and enter:
>Install-Module -Name VMware.PowerCLI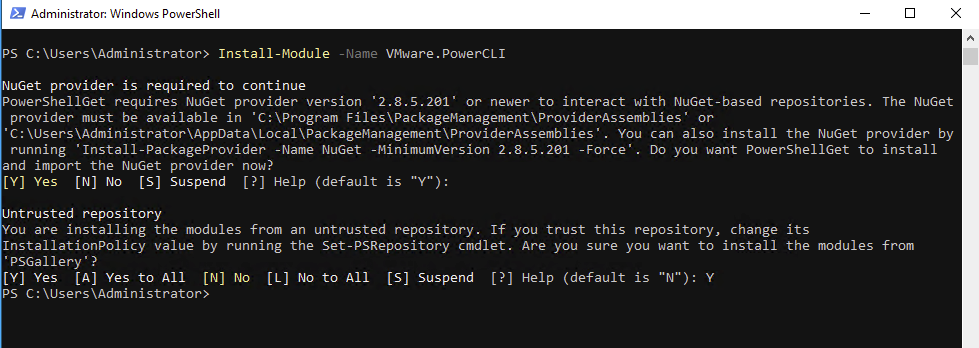
Before connecting to vCenter, check ExecutionPolicy. If Restricted set it on Unrestricted using command bellow:
>Get-ExecutionPolicy
Restricted
>Set-ExecutionPolicy Unrestricted
After that, login to vCenter using command bellow and you will get the following message.
>Connect-VIServer -Server <Server_FQDN_or_IP> -user <login_user>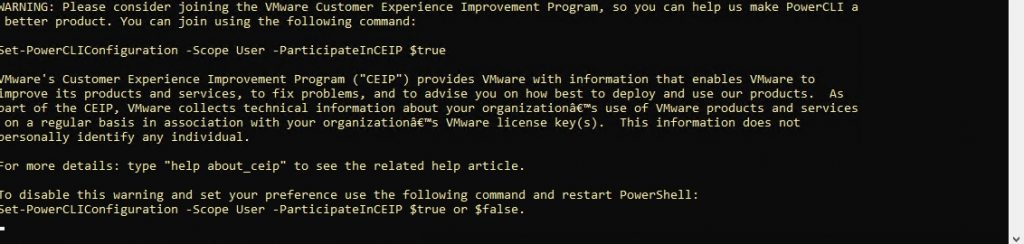
As it says, if you want to participate to the Customer Experience Impovement Program (“CEIP”), issue the command with parameter $true at the end, if you don’t want use $false. I opted not to participate:
>Set-PowerCLIConfiguration -Scope User -ParticipateCEIP $falseIf you are using a selfsigned certificate, you have to run the following command to be able to connect:
>Set-PowerCLIConfiguration -InvalidCertificateAction Ignore -Confirm:$false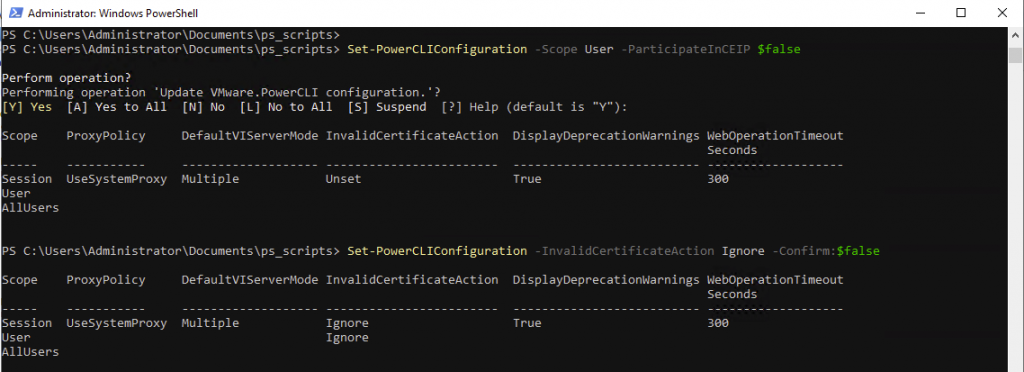
Another option would be to install PowerCLI Program.
Authenticate to VMware vSphere
After preparing the environment, the next step is to connect and authenticate to the VMware vSphere.
Let’s see the login function.
# Function to login to vCenter
function Login-VCenter {
    $vcServer = Read-Host "Enter vCenter server"
    $credential = Get-Credential -Message "Enter your vCenter credentials"

    try {
        Connect-VIServer -Server $vcServer -Credential $credential -ErrorAction Stop
        [Console]::ForegroundColor = [ConsoleColor]::Green
        Write-Host ("Successfully connected to vCenter server." + [System.Environment]::NewLine)
        [Console]::ResetColor()
        Write-Host ""
    } catch {
        Write-Host "Cannot complete login due to an incorrect user name or password." -ForegroundColor Red
        Write-Host "Exiting script."
        exit
    }
}


# Automatically log in to vCenter
Login-VCenter
The function above will prompt for vCenter, User and Password. If successfully connected, it will display the message in green, if not in red.
UPDATE: Login to multiple vCenters
Based on feedback from one of my readers, I have enhanced the function to allow connections to multiple vCenters. After entering the first vCenter, the function now prompts you to decide whether to connect to another vCenter. If you choose to do so, you’ll be asked whether to reuse the same credentials or provide new ones. This added flexibility ensures the function can accommodate environments with multiple vCenters, each potentially requiring unique credentials.
# Function to login to multiple vCenters
function Login-MultipleVCenters {
    function Login-VCenter {
        param (
            [string]$vcServer,
            [PSCredential]$credential
        )

        try {
            Connect-VIServer -Server $vcServer -Credential $credential -ErrorAction Stop
            [Console]::ForegroundColor = [ConsoleColor]::Green
            Write-Host ("Successfully connected to vCenter server: $vcServer." + [System.Environment]::NewLine)
            [Console]::ResetColor()
        } catch {
            Write-Host "Cannot complete login to $vcServer due to an incorrect user name or password or other issue." -ForegroundColor Red
            throw
        }
    }

    # Clear existing connections
    $global:DefaultVIServer = @()

    # Initial login
    $vcServer = Read-Host "Enter vCenter server"
    $credential = Get-Credential -Message "Enter your vCenter credentials"

    try {
        Login-VCenter -vcServer $vcServer -credential $credential
    } catch {
        Write-Host "Exiting script." -ForegroundColor Red
        exit
    }

    # Prompt for additional vCenters
    while ($true) {
        $response = Read-Host "Would you like to connect to another vCenter? (Yes/No)"

        if ($response -match "(?i)^y(?:es)?$") {
            $additionalVCenter = Read-Host "Enter the FQDN or IP address of the next vCenter"
            $useSameCredentials = Read-Host "Would you like to use the same credentials for $additionalVCenter? (Yes/No)"

            if ($useSameCredentials -match "(?i)^y(?:es)?$") {
                try {
                    Login-VCenter -vcServer $additionalVCenter -credential $credential
                } catch {
                    Write-Host "Failed to connect to vCenter: $additionalVCenter. Skipping to next prompt." -ForegroundColor Yellow
                }
            } elseif ($useSameCredentials -match "(?i)^no?$") {
                $newCredential = Get-Credential -Message "Enter credentials for $additionalVCenter"
                try {
                    Login-VCenter -vcServer $additionalVCenter -credential $newCredential
                } catch {
                    Write-Host "Failed to connect to vCenter: $additionalVCenter. Skipping to next prompt." -ForegroundColor Yellow
                }
            } else {
                Write-Host "Invalid response. Please enter 'Yes' or 'No'." -ForegroundColor Red
            }
        } elseif ($response -match "(?i)^no?$") {
            Write-Host "No additional vCenters to connect. Proceeding to menu." -ForegroundColor Yellow
            break
        } else {
            Write-Host "Invalid response. Please enter 'Yes' or 'No'." -ForegroundColor Red
        }
    }

    Write-Host "Connection process complete." -ForegroundColor Green
}

# Automatically log in to multiple vCenters
Login-MultipleVCenters
List Snapshots
The first function that will deal with the snapshots is listing of the snapshots. The function will also add a number in front of each snapshot, identifying this way the total number of present snapshots.
# Function to list snapshots
function List-Snapshots {
    $snapshots = Get-VM | Get-Snapshot

    if ($snapshots.Count -eq 0) {
        Write-Host "No snapshots found."
    } else {
        Write-Host "Snapshots:"
        for ($i = 0; $i -lt $snapshots.Count; $i++) {
            Write-Host "$($i + 1). VM: $($snapshots[$i].VM.Name), Snapshot: $($snapshots[$i].Name)"
        }
    }
}
Create Snapshot
The next necessary action would be to create a snapshot. We have to know first the name of the VM in order to create a Snapshot. It’s not our goal here to list all the VMs present in our virtual environment, you can take the name of VM from vCenter or ESXi Host.
# Function to create a snapshot
function Create-Snapshot {
    $vmName = Read-Host "Enter the name of the VM"
    $vm = Get-VM -Name $vmName

    if ($vm) {
        $snapshotName = Read-Host "Enter the name of the snapshot"
        $snapshotDescription = Read-Host "Enter the description of the snapshot"
        New-Snapshot -VM $vm -Name $snapshotName -Description $snapshotDescription
        Write-Host "Snapshot $($snapshotName) created for VM $($vm.Name)."
    } else {
        Write-Host "VM $($vmName) not found."
    }
}
Restore Snapshot
So until now we listed, we created… what about revert to one of the snapshots!?
# Function to restore a snapshot
function Restore-Snapshot {
    $snapshots = Get-VM | Get-Snapshot

    if ($snapshots.Count -eq 0) {
        Write-Host "No snapshots found."
        return
    }

    List-Snapshots

    $snapshotNumber = Read-Host "Enter the number of the snapshot to restore"

    if ([int]$snapshotNumber -ge 1 -and [int]$snapshotNumber -le $snapshots.Count) {
        $snapshot = $snapshots[$snapshotNumber - 1]
        $confirmation = Read-Host "Are you sure you want to restore snapshot $($snapshot.Name) for VM $($snapshot.VM.Name)? (Y/N)"
        if ($confirmation -eq "Y" -or $confirmation -eq "y") {
            Set-VM -VM $snapshot.VM -Snapshot $snapshot
            Write-Host "Restored snapshot $($snapshot.Name) for VM $($snapshot.VM.Name)."
        } else {
            Write-Host "Restoration cancelled."
        }
    } else {
        Write-Host "Invalid snapshot number."
    }
}
Here we’ll use at the beginning the List-Snapshots function to see all the snapshots. After that, we have to enter only the corresponding number and the snapshot will be restored, of course not before a supplementary confirmation.
Delete Snapshot
And the last available function will be to delete the snapshots.
# Function to delete a snapshot
function Delete-Snapshot {
    List-Snapshots
    $snapshotNumber = Read-Host "Enter the number of the snapshot to delete"

    if ([int]::TryParse($snapshotNumber, [ref]0)) {
        $snapshotNumber = [int]$snapshotNumber
        $snapshots = Get-VM | Get-Snapshot

        if ($snapshotNumber -ge 1 -and $snapshotNumber -le $snapshots.Count) {
            $snapshotToDelete = $snapshots[$snapshotNumber - 1]
            Write-Host "You've chosen to delete the snapshot $($snapshotToDelete.Name) for VM $($snapshotToDelete.VM.Name)."

            $confirmation = Read-Host "Are you sure you want to delete this snapshot? (Y/N)"
            if ($confirmation -eq "Y" -or $confirmation -eq "y") {
                #$originalErrorActionPreference = $ErrorActionPreference
                #$ErrorActionPreference = "SilentlyContinue"
                Remove-Snapshot -Snapshot $snapshotToDelete -Confirm:$false
                #$ErrorActionPreference = $originalErrorActionPreference
                Write-Host "Snapshot $($snapshotToDelete.Name) deleted."
            } else {
                Write-Host "Snapshot deletion cancelled."
            }
        } else {
            Write-Host "Invalid snapshot number."
        }
    } else {
        Write-Host "Invalid input. Please enter a valid number."
    }
}
We’ll use again the List-Snapshots function, after that all we have to do is to select the number of the snapshot that we want to remove.
These were the basic functions and their corresponding scripts, but we can add some more power to the main script by including functionalities that will be aplied on multiple VMs simultaneously.
Export snapshots to a CSV file
This script will get all the snapshots from vCenter and export them to a CSV file in the current location with the name export_DATE_TIME.csv. The file will include the VM’s name and snapshots’ name.
# Function to export snapshots to a file
function Export-Snapshots {
    $snapshots = Get-VM | Get-Snapshot

    if ($snapshots.Count -eq 0) {
        Write-Host "No snapshots found to export."
        return
    }

    $exportFileName = "export_$(Get-Date -Format 'yyyyMMdd_HHmmss').csv"
    $snapshotsData = @()

    foreach ($snapshot in $snapshots) {
        $snapshotData = [PSCustomObject]@{
            VMName = $snapshot.VM.Name
            SnapshotName = $snapshot.Name
        }
        $snapshotsData += $snapshotData
    }

    $snapshotsData | Export-Csv -Path $exportFileName -NoTypeInformation
    Write-Host "Snapshots exported to $($exportFileName)."
}
Import snapshots from a CSV file and prompt for creation
The script will get the Name of VMs and corresponding Snapshots’ name and will create the snapshots on vCenter. Before creation, the user will see the list of snapshots and will be prompted for a confirmation.
# Function to import snapshots from a CSV file and prompt for creation
function Import-File-And-Create-Snapshots {
    $importFile = Read-Host "Enter the path to the import CSV file"

    if (-not (Test-Path $importFile)) {
        Write-Host "Import file not found."
        return
    }

    $snapshotsData = Import-Csv -Path $importFile

    if ($snapshotsData.Count -eq 0) {
        Write-Host "No snapshots found in the import file."
        return
    }

    Write-Host "Snapshots to create from the import file:"
    foreach ($snapshotData in $snapshotsData) {
        Write-Host "VM: $($snapshotData.VMName), Snapshot: $($snapshotData.SnapshotName)"
    }

    $confirmation = Read-Host "Are you sure you want to create these snapshots? (Y/N)"

    if ($confirmation -eq "Y" -or $confirmation -eq "y") {
        foreach ($snapshotData in $snapshotsData) {
            $vmName = $snapshotData.VMName
            $vm = Get-VM -Name $vmName

            if ($vm) {
                $snapshotName = $snapshotData.SnapshotName
                $snapshotDescription = "Imported snapshot from file"
                New-Snapshot -VM $vm -Name $snapshotName -Description $snapshotDescription
                Write-Host "Snapshot $($snapshotName) created for VM $($vmName)."
            } else {
                Write-Host "VM $($vmName) not found."
            }
        }
    } else {
        Write-Host "Creation cancelled."
    }
}
Import snapshots from CSV file and prompt for deletion
The script will get the Name of VMs and corresponding Snapshots’ name and will delete these snapshots on vCenter. Before deleting them, the user will see the list of snapshots to be deleted and will be prompted for a confirmation.
# Function to import snapshots from a CSV file and prompt for deletion
function Import-File-And-Delete-Snapshots {
    $importFile = Read-Host "Enter the path to the import CSV file"

    if (-not (Test-Path $importFile)) {
        Write-Host "Import file not found."
        return
    }

    $snapshotsData = Import-Csv -Path $importFile

    if ($snapshotsData.Count -eq 0) {
        Write-Host "No snapshots found in the import file."
        return
    }

    Write-Host "Snapshots to delete from the import file:"
    foreach ($snapshotData in $snapshotsData) {
        Write-Host "VM: $($snapshotData.VMName), Snapshot: $($snapshotData.SnapshotName)"
    }

    $confirmation = Read-Host "Are you sure you want to delete these snapshots? (Y/N)"

    if ($confirmation -eq "Y" -or $confirmation -eq "y") {
        foreach ($snapshotData in $snapshotsData) {
            $vmName = $snapshotData.VMName
            $snapshotName = $snapshotData.SnapshotName
            $vm = Get-VM -Name $vmName

            if ($vm) {
                $snapshot = Get-Snapshot -VM $vm -Name $snapshotName
                if ($snapshot) {
                    Remove-Snapshot -Snapshot $snapshot -Confirm:$false
                    Write-Host "Snapshot $($snapshotName) deleted for VM $($vmName)."
                } else {
                    Write-Host "Snapshot $($snapshotName) not found for VM $($vmName)."
                }
            } else {
                Write-Host "VM $($vmName) not found."
            }
        }
    } else {
        Write-Host "Deletion cancelled."
    }
}
We can test each function independently, but it will make more sense to integrate all of them into a script.
Main Menu from where will run all the functions
From here will access all the existing functions by pressing the corresponding letter. (L) for listing snapshots, (C) for creating them and so on.
# Main loop
$continueLoop = $true
while ($continueLoop) {
    Write-Host "Choose an action:"
    Write-Host " (L)ist snapshots"
    Write-Host " (C)reate snapshot"
    Write-Host " (R)estore snapshot"
    Write-Host " (D)elete snapshot"
    Write-Host " (E)xport snapshots to file"
    Write-Host " (I)mport file and create snapshots"
    Write-Host " i(M)port file and delete snapshots"
    Write-Host " (Q)uit"

    $action = Read-Host -Prompt "Enter your choice"

    switch ($action.ToUpper()) {
        "C" {
            Create-Snapshot
        }
        "L" {
            List-Snapshots-Numbered
        }
        "R" {
            Restore-Snapshot-By-Number
        }
        "D" {
            Delete-Snapshot-By-Number
        }
        "E" {
            Export-Snapshots
        }
        "I" {
            Import-File-And-Create-Snapshots
        }
        "M" {
            Import-File-And-Delete-Snapshots
        }
        "Q" {
            Write-Host "Exiting script."
            Disconnect-VIServer -Server $global:DefaultVIServer -Confirm:$false
            $continueLoop = $false
            break
        }
        default {
            Write-Host "Invalid choice."
        }
    }
}
Final script including all functions
Here I added the final script. Just copy it and make fun with it.
Download from github
UPDATE: Download the script that connects to multiple vCenters from here.
Conclusion
In summary, building a PowerShell script to manage VMware snapshots was a cool and challenging project. Working through the ins and outs of virtual environments was a fun and rewarding experience, highlighting the dynamic nature of this solution. Despite the complexities, every coding hurdle became an opportunity for skill enhancement, making this scripting journey both enjoyable and insightful.
Is there a way to run this against more than one vCenter server?
Hey, Noel! I’ve updated the login function, now you will be able to connect to multiple vCenters. Please check the function here or download the whole modified script from Github